| September 6, 2020 |
How to Activate a License for SIOS Clustering Software |
| August 30, 2020 |
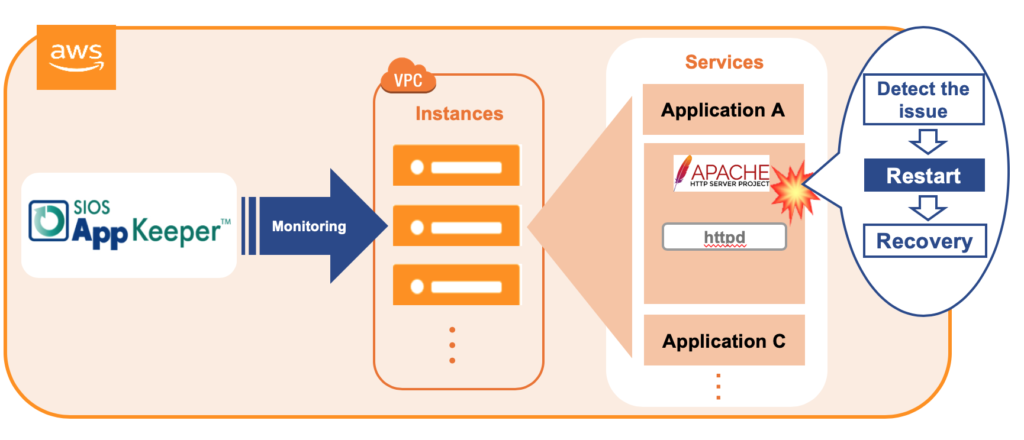
What If We Eliminated Apache Downtime?
|
| August 25, 2020 |
Tips for Restoring SIOS Protection Suite for Linux Configuration Specifics
Tips for Restoring SIOS Protection Suite for Linux Configuration SpecificsNice job “Random Co-worker”! And by nice job, I didn’t really mean nice job. And by “Random Coworker” I mean the guy who checked the box that shouldn’t be checked, or unchecked the box that should be checked, the man or woman who skipped the message and the warning, and the “Please confirm” safety measures and just wrecked your SIOS Protection Suite for Linux configuration. We’ve all been there. It was an accident. However it happened, it happened. Suddenly you are scrambling to figure out what to do to recover the configuration, the data, and the “whatever” before the boss finds out. As the VP of Customer Experience at SIOS Technology Corp. our teams are actively working with partners and customers to architect and implement enterprise availability to protect their systems from downtime. Accidents happen, and a recent customer experience reminded me that even with our multiple checks and warnings, even the SIOS Protection Suite for Linux product isn’t immune to accidental configuration changes, but there is a simple tip for faster recovery from the “Random Coworker’s” accidental blunder. How to Recover SIOS Protection Suite for Linux After Accidental Configuration ChangesNative to the SIOS Protection Suite for Linux (SPS-L) is a tool called lkbackup, located under /opt/LifeKeeper/bin/lkbackup. The tool, as the name might suggest, creates a backup of the SPS-L configuration details. Note: This tool does not backup all of the application data, but it does create a backup of all the data for the SPS-L configuration such as: resource definitions, tunables configured in the /etc/default/LifeKeeper file, customer created generic application scripts, flags associated with the state of the cluster, communication path/cluster definitions, and more. [root@baymax ~ ] # /opt/LifeKeeper/bin/lkbackup -c -f /root/mylkbackup-5.15.2020-v9.4.1 –cluster –ssh Example: : lkbackup create syntax This creates a backup file named mylkbackup-5.15.2020-v9.4.1 under the /root folder. The –cluster tells lkbackup to create the same file on each cluster node. The –ssh uses ssh protocol to connect to each cluster node. Additional lkbackup details are here: Our Customer Experience Services Team recommends taking a backup before making SPS-L configuration changes, such as upgrades, resource removal or addition, or configuration changes. So when you need to restore the SPS-L configuration, the change is as simple as running lkbackup again. [root@baymax ~ ] # /opt/LifeKeeper/bin/lkbackup -x -f /root/mylkbackup-5.15.2020-v9.4.1 –cluster –ssh Example: lkbackup restore syntax Autobackup Feature Automatically Captures a lkbackup FileBut, what do you do if you forgot to run lkbackup to create this file before your “Random Coworker” blundered away hours of SPS-L setup and configuration? What do you do if the “Guy” or “Gal” who set up SPS-L is on vacation, paternity or maternity leave? What if you are the “Random Coworker” and Steve from the Basis Team is heading down the hallway to see how things are going? For most installations, SIOS enables an autobackup feature during the installation. This autobackup feature will automatically capture a lkbackup file for you at 3am local time, under /opt/LifeKeeper/config/auto-backup.#.tgz [root@baymax ~]# ls -ltr /opt/LifeKeeper/config/auto-backup.*
Example. Output from config/auto-backup listing If your system has been installed and configured properly, the autobackups have been running each night, ready to cover you when your “Random Coworker” strikes. Find the SPS-L auto-backup.#.tgz before the blunder, and using the SPS-L lkbackup tool, retrieve and restore your SIOS Protection Suite for Linux Configuration to the previously configured state. [root@baymax ~ ] # lkstop; /opt/LifeKeeper/bin/lkbackup -c -f /opt/LifeKeeper/config/auto-backup.0.tgz Example: lkbackup restore syntax for auto-backup Repeat this on the other nodes in the cluster as required. Note. If your system doesn’t appear to be configured to generate the auto-backup files and protect you from your own “Random Coworker”, SIOS offers installation and configuration services, and configuration health checks performed by a SIOS Professional Services Engineer. — Cassius Rhue, VP, Customer Experience Reproduced with permission from SIOS |
| August 18, 2020 |
Step-By-Step: How to configure a SANless MySQL Linux failover cluster in Amazon EC2
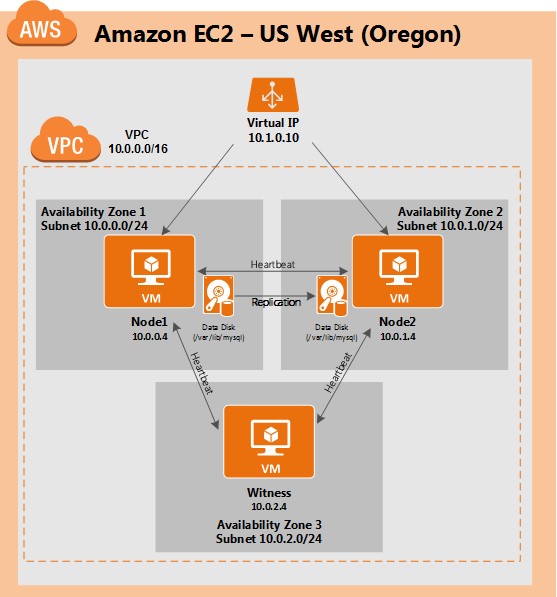
Step-By-Step: How to configure a SANless MySQL Linux failover cluster in Amazon EC2In this step by step guide, I will take you through all steps required to configure a highly available, 2-node MySQL cluster (plus witness server) in Amazon’s Elastic Compute Cloud (Amazon EC2). The guide includes both screenshots, shell commands and code snippets as appropriate. I assume that you are somewhat familiar with Amazon EC2 and already have an account. If not, you can sign up today. I’m also going to assume that you have basic familiarity with Linux system administration and failover clustering concepts like Virtual IPs, etc. Failover clustering has been around for many years. In a typical configuration, two or more nodes are configured with shared storage to ensure that in the event of a failover on the primary node, the secondary or target node(s) will access the most up-to-date data. Using shared storage not only enables a near-zero recovery point objective, it is a mandatory requirement for most clustering software. However, shared storage presents several challenges. First, it is a single point of failure risk. If shared storage – typically a SAN – fails, all nodes in the cluster fails. Second, SANs can be expensive and complex to purchase, setup and manage. Third, shared storage in public clouds, including Amazon EC2 is either not possible, or not practical for companies that want to maintain high availability (99.99% uptime), near-zero recovery time and recovery point objectives, and disaster recovery protection. The following demonstrates how easy it is to create a SANless cluster in the clouds to eliminate these challenges while meeting stringent HA/DR SLAs. The steps below use MySQL database with Amazon EC2 but the same steps could be adapted to create a 2-node cluster in AWS to protect SQL, SAP, Oracle, or any other application. NOTE: Your view of features, screens and buttons may vary slightly from screenshots presented below 1. Create a Virtual Private Cloud (VPC) OverviewThis article will describe how to create a cluster within a single Amazon EC2 region. The cluster nodes (node1, node2 and the witness server) will reside different Availability Zones for maximum availability. This also means that the nodes will reside in different subnets.
The following IP addresses will be used:
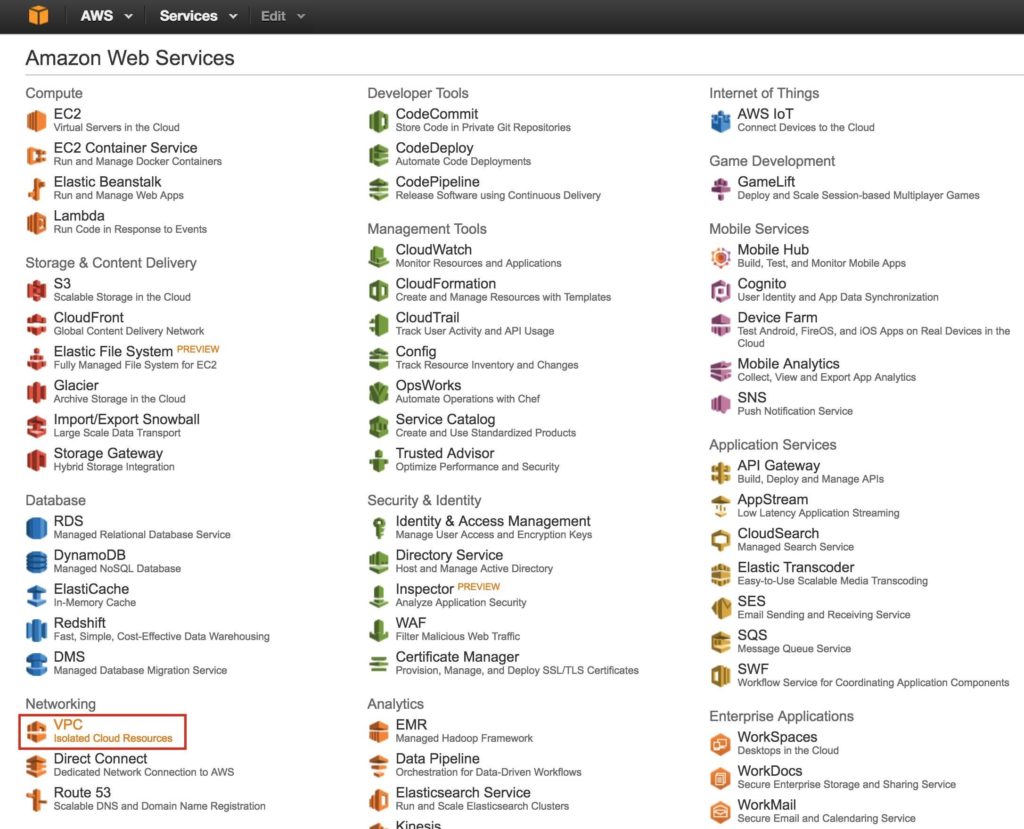
Step 1: Create a Virtual Private Cloud (VPC)First, create a Virtual Private Cloud (aka VPC). A VPC is an isolated network within the Amazon cloud that is dedicated to you. You have full control over things like IP address blocks and subnets, route tables, security groups (i.e. firewalls), and more. You will be launching your Azure Iaas virtual machines (VMs) into your Virtual Network. From the main AWS dashboard, select “VPC”
Under “Your VPCs”, make sure you have selected the proper region at the top right of the screen. In this guide the “US West (Oregon)” region will be used, because it is a region that has 3 Availability Zones. For more information on Regions and Availability Zones, click here.
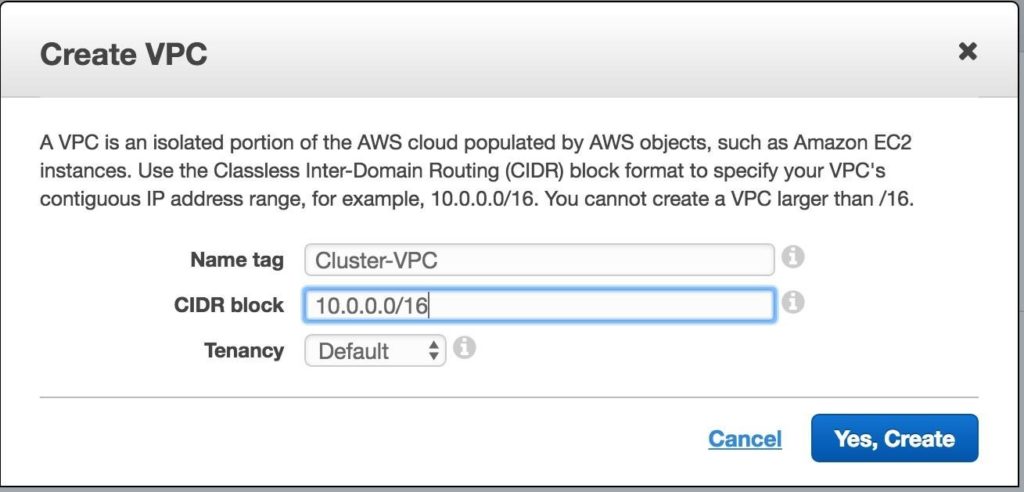
Give the VPC a name, and specify the IP block you wish to use. 10.0.0.0/16 will be used in this guide:
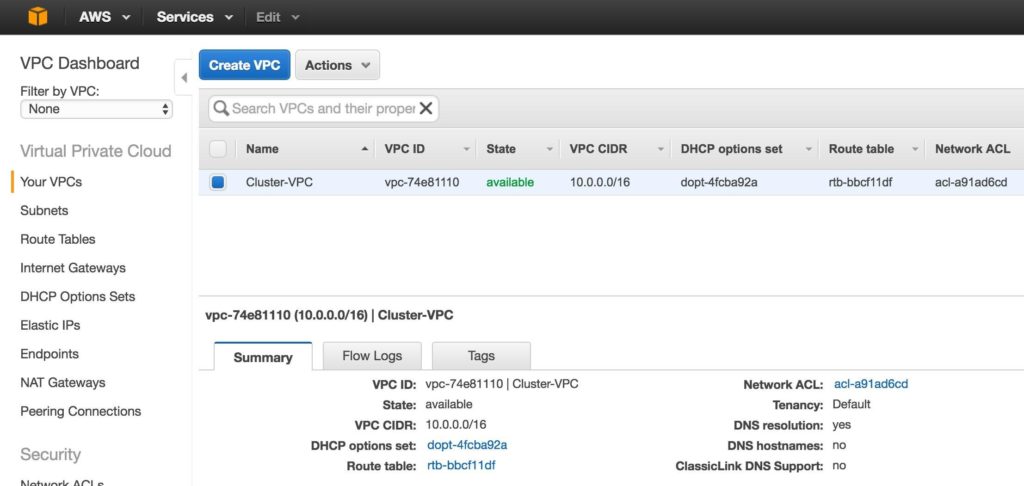
You should now see the newly created VPC on the “Your VPCs” screen:
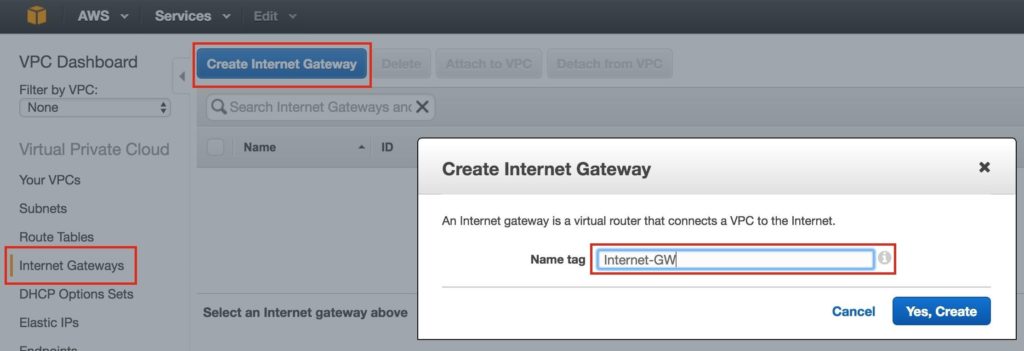
Step 2: Create an Internet GatewayNext, create an Internet Gateway. This is required if you want your Instances (VMs) to be able to communicate with the internet. On the left menu, select Internet Gateways and click the Create Internet Gateway button. Give it a name, and create:
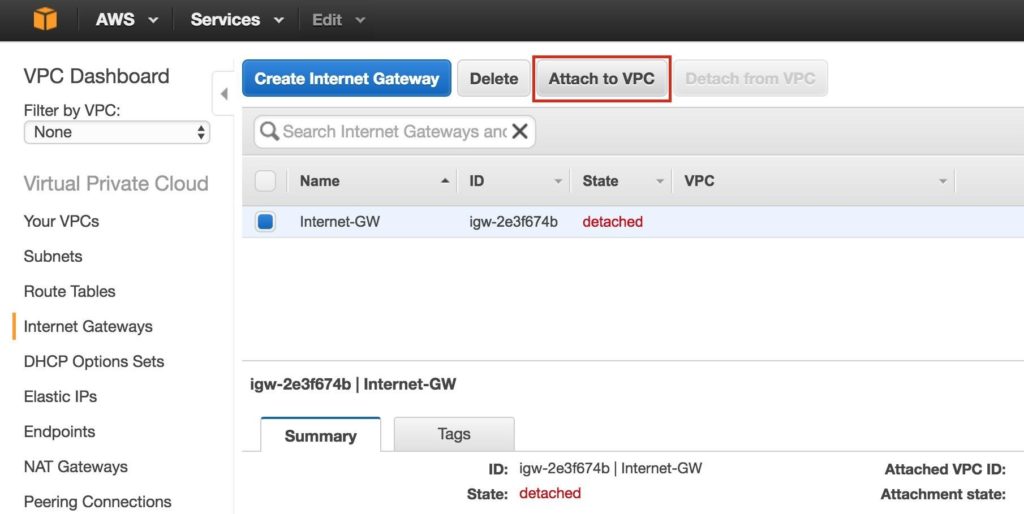
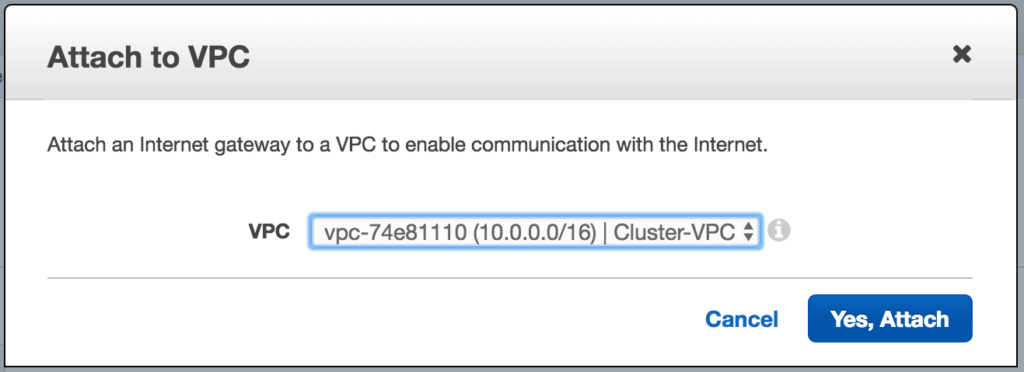
Next, attach the internet gateway to your VPC:
Select your VPC, and click Attach:
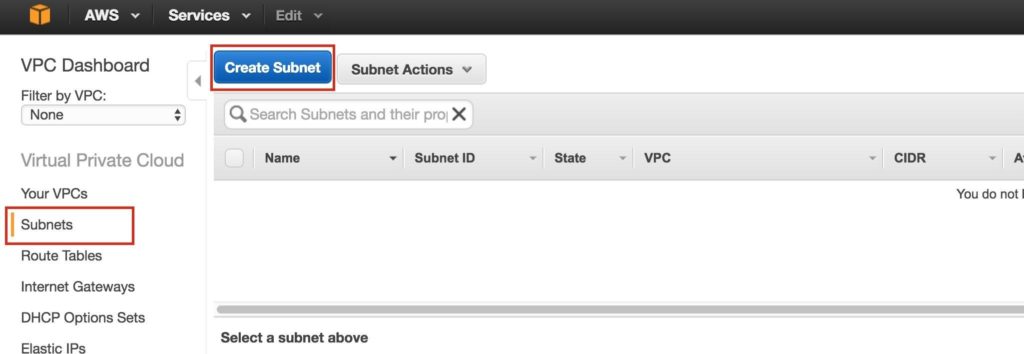
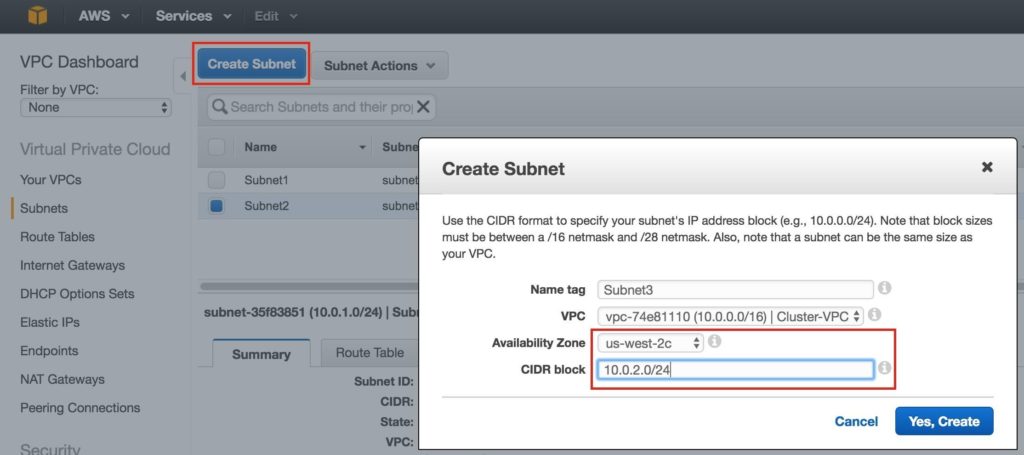
Step 3: Create Subnets (Availability Zones)Next, create 3 subnets. Each subnet will reside in it’s own Availability Zone. The 3 Instances (VMs: node1, node2, witness) will be launched into separate subnets (and therefore Availability Zones) so that the failure of an Availability Zone won’t take out multiple nodes of the cluster. The US West (Oregon) region, aka us-west-2, has 3 availability zones (us-west-2a, us-west-2b, us-west-2c). Create 3 subnets, one in each of the 3 availability zones. Under VPC Dashboard, navigate to Subnets, and then Create Subnet:
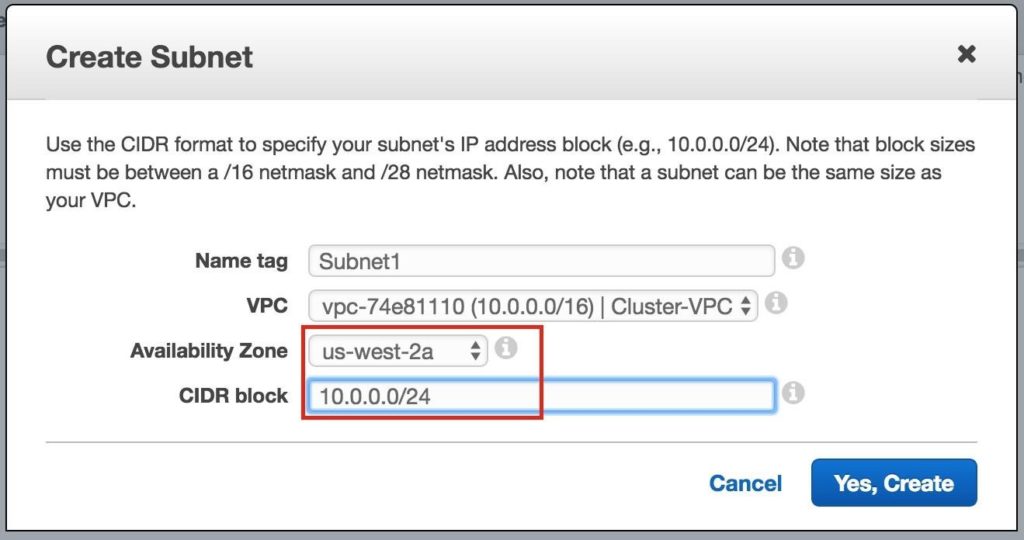
Give the first subnet a name (“Subnet1)”, select the availability zone us-west-2a, and define the network block (10.0.0.0/24):
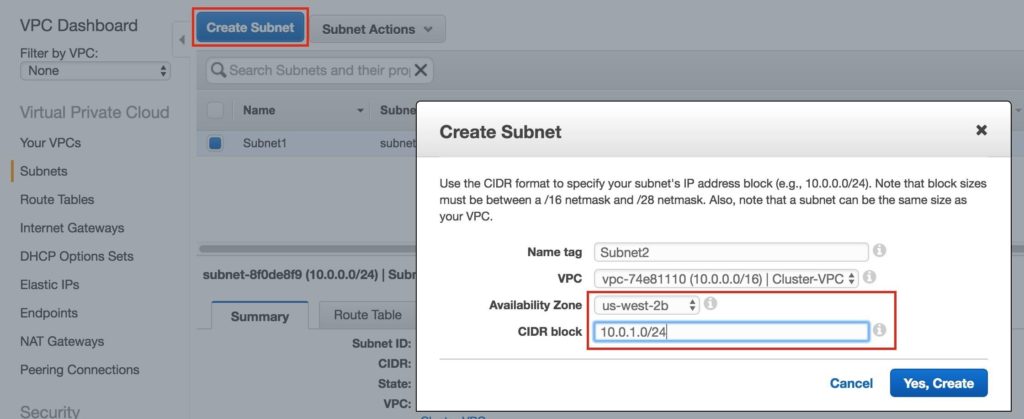
Repeat to create the second subnet availability zone us-west-2b:
Repeat to create the third subnet in availability zone us-west-2c:
Once complete, verify that the 3 subnets have been created, each with a different CIDR block, and in separate Availability Zones, as seen below:
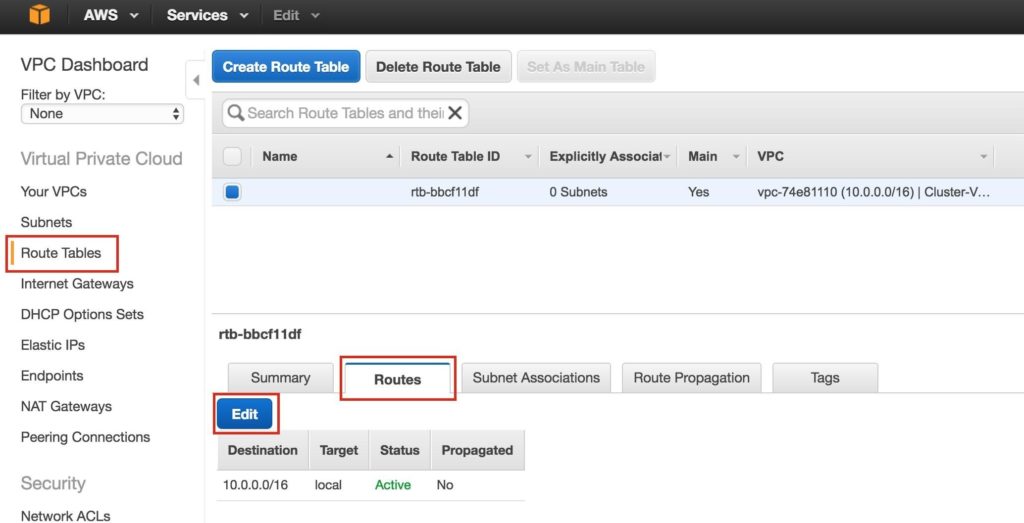
Step 4: Configure Route TablesUpdate the VPC’s route table so that traffic to the outside world is sent to the Internet Gateway created in a previous step. From the VPC Dashboard, select Route Tables. Go to the Routes tab, and by default only one route will exist which allows traffic only within the VPC. Click Edit:
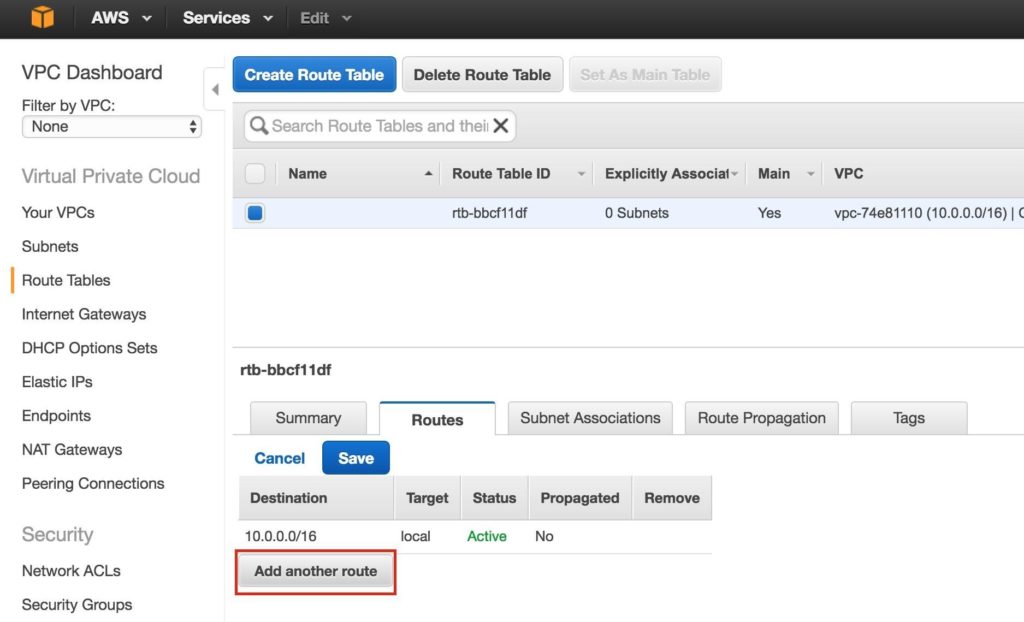
Add another route:
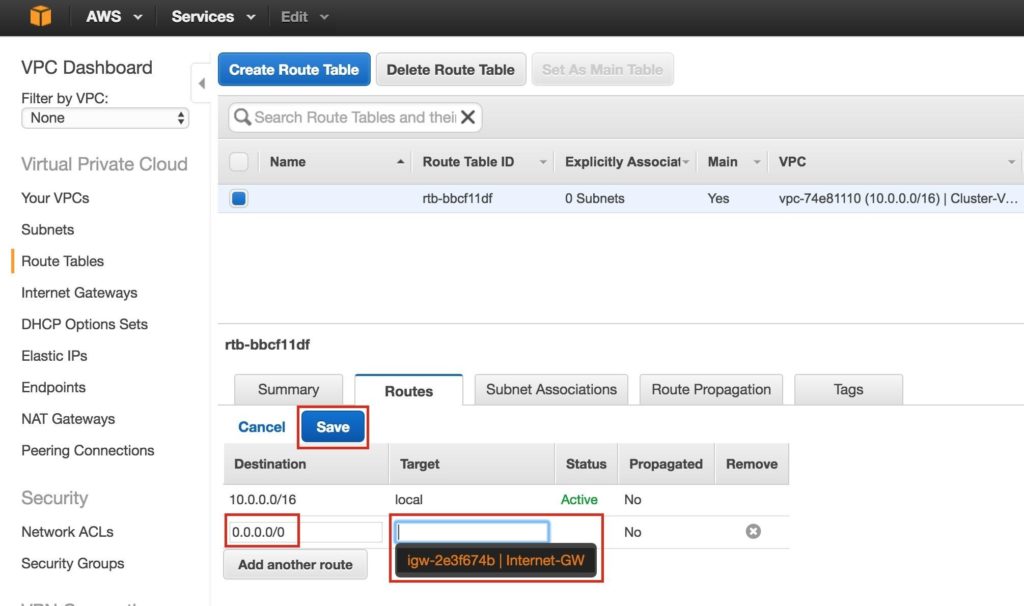
The Destination of the new route will be “0.0.0.0/0” (the internet) and for Target, select your Internet Gateway. Then click Save:
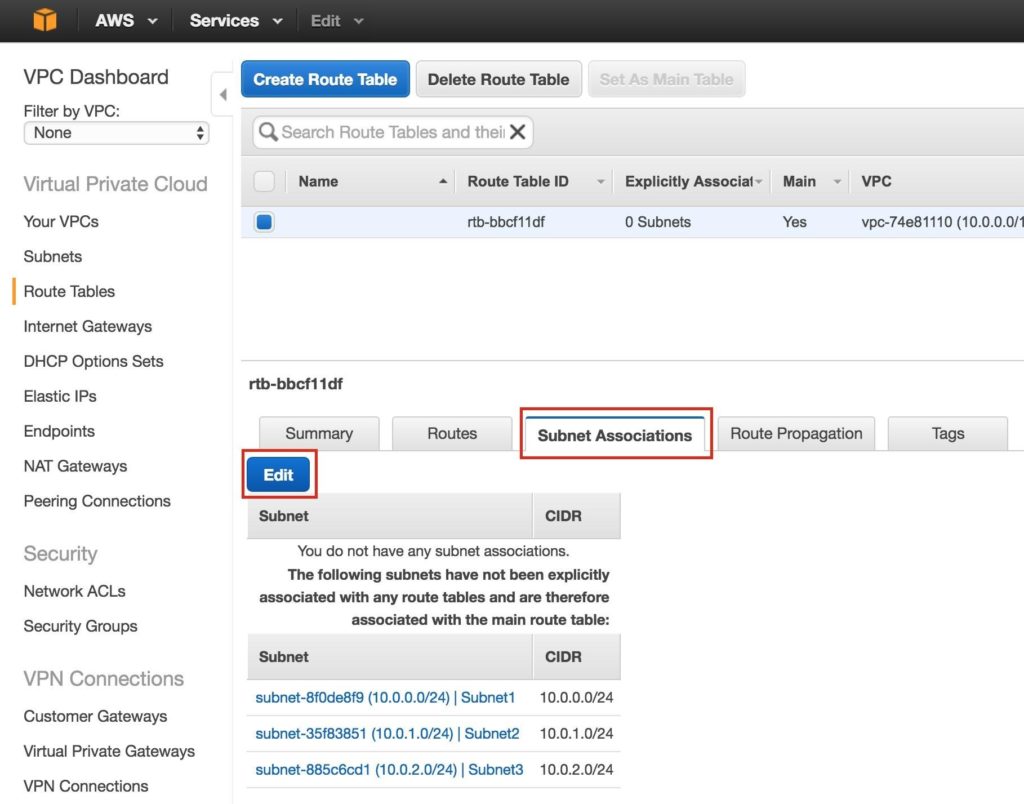
Next, associate the 3 subnets with the Route Table. Click the “Subnet Associations” tab, and Edit:
Check the boxes next to all 3 subnets, and Save:
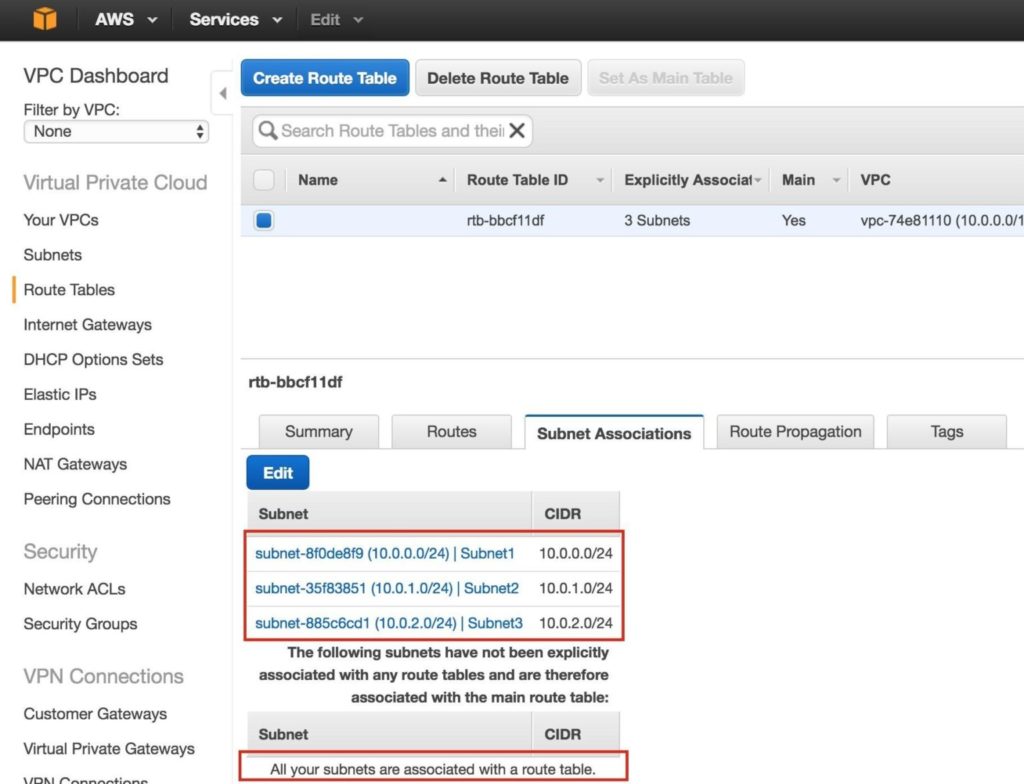
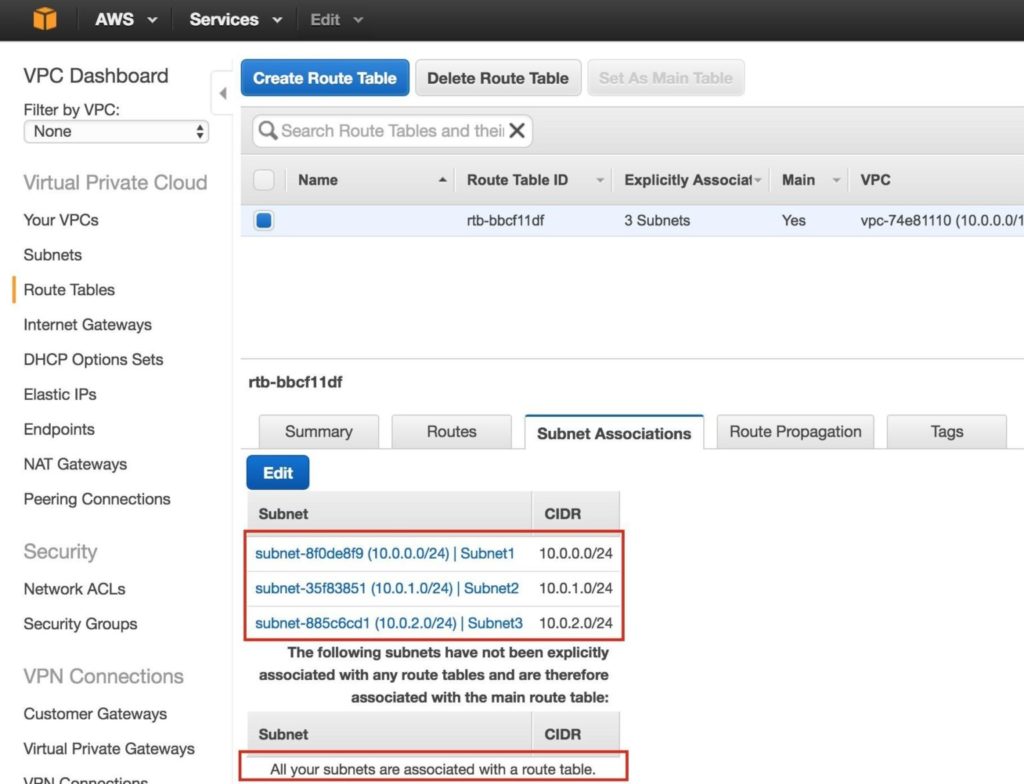
Verify that the 3 subnets are associated with the main route table:
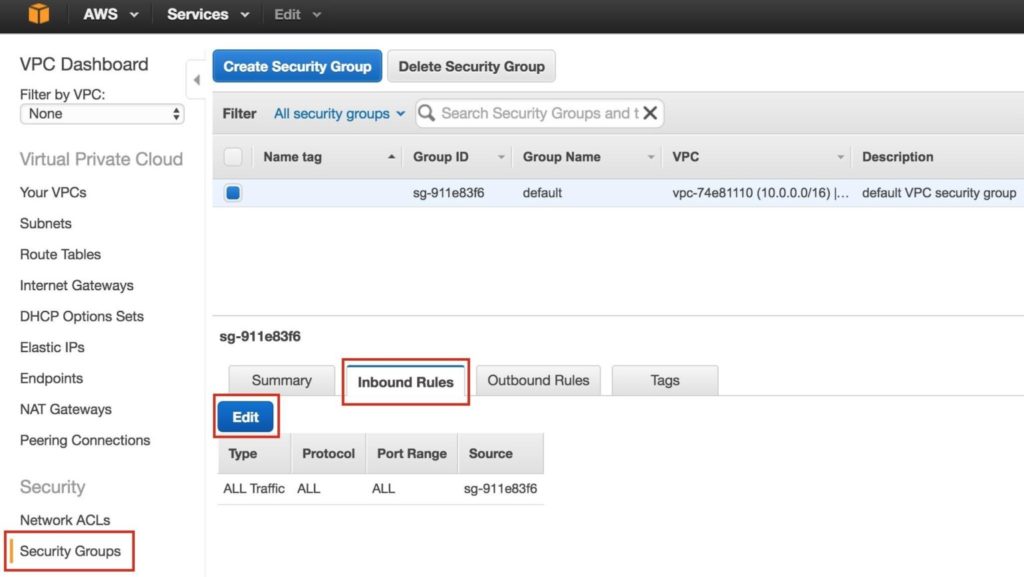
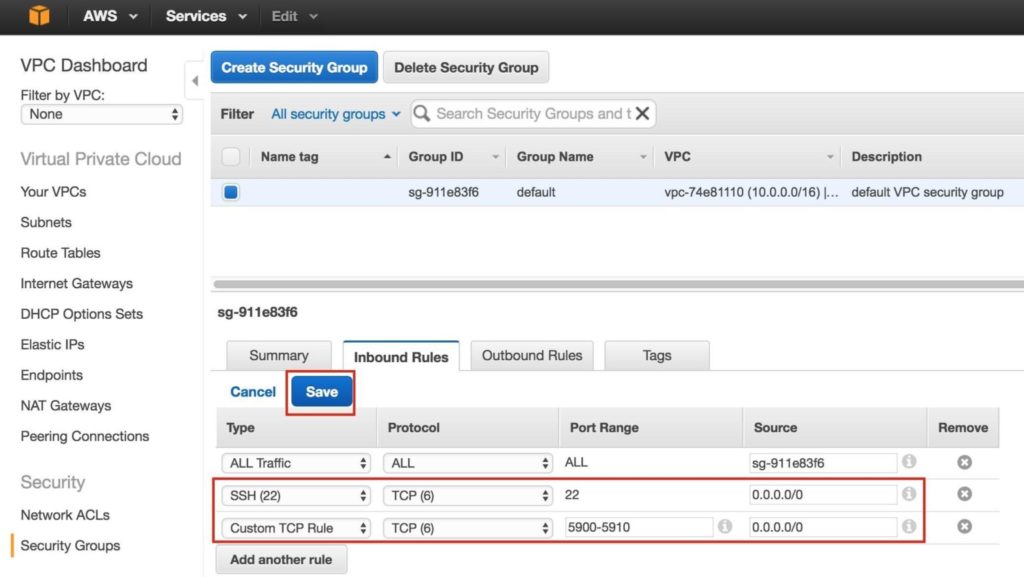
Later, we will come back and update the Route Table once more, defining a route that will allow traffic to communicate with the cluster’s Virtual IP, but this needs to be done AFTER the linux Instances (VMs) have been created. Step 5: Configure Security GroupEdit the Security Group (a virtual firewall) to allow incoming SSH and VNC traffic. Both will later be used to configure the linux instances as well as installation/configuration of the cluster software. On the left menu, select “Security Groups” and then click the “Inbound Rules” tab. Click Edit:
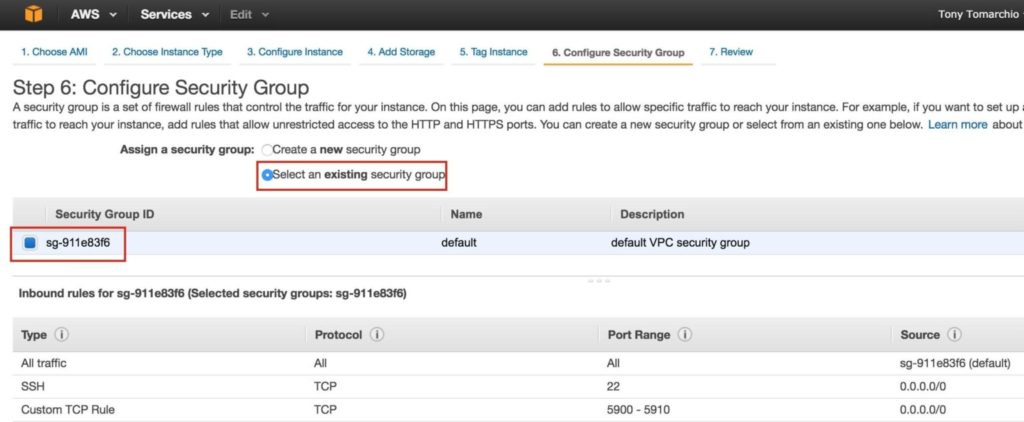
Add rules for both SSH (port 22) and VNC. VNC generally uses ports in the 5900, depending on how you configure it, so for the purposes of this guide, we will open the 5900-5910 port range. Configure accordingly based on your VNC setup:
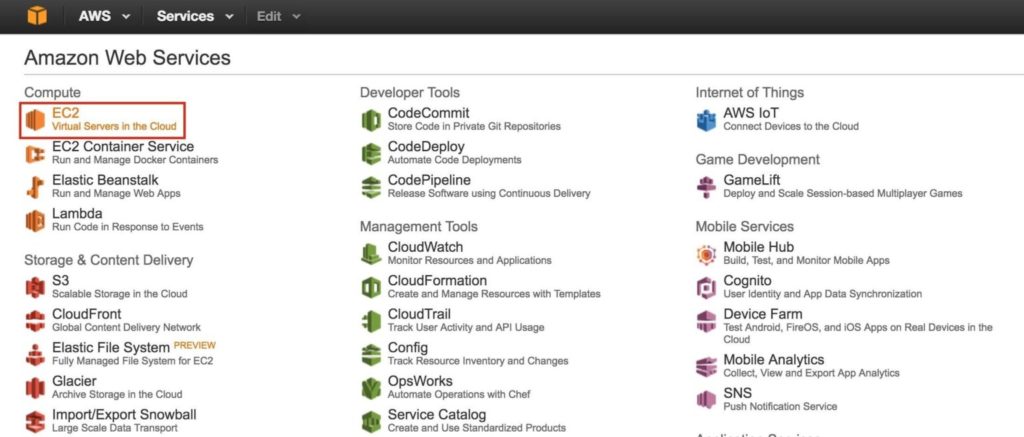
Step 6: Launch InstancesWe will be provisioning 3 Instances (Virtual Machines) in this guide. The first two VMs (called “node1” and “node2”) will function as cluster nodes with the ability to bring the MySQL database and it’s associated resources online. The 3rd VM will act as the cluster’s witness server for added protection against split-brain. To ensure maximum availability, all 3 VMs will be deployed into different Availability Zones within a single region. This means each instance will reside in a different subnet. Go to the main AWS dashboard, and select EC2:
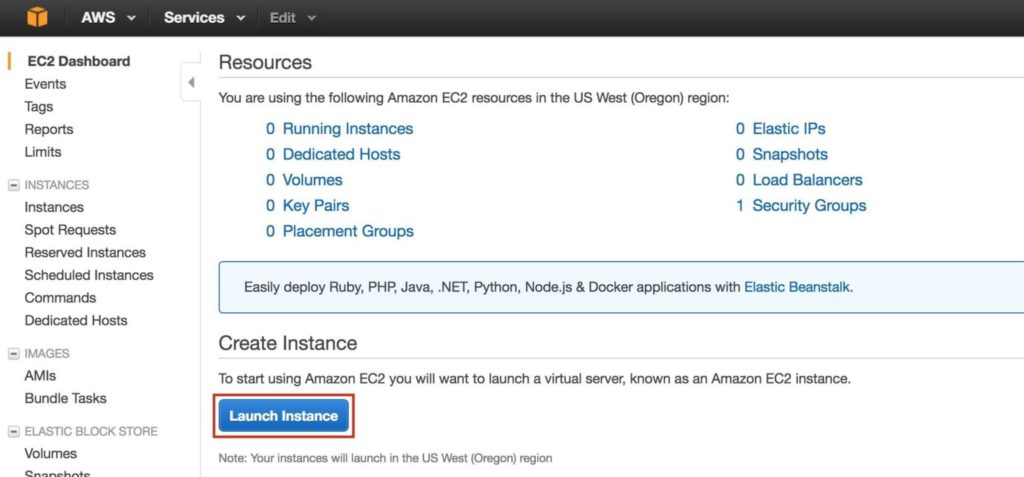
Create “node1” Create your first instance (“node1”). Click Launch Instance:
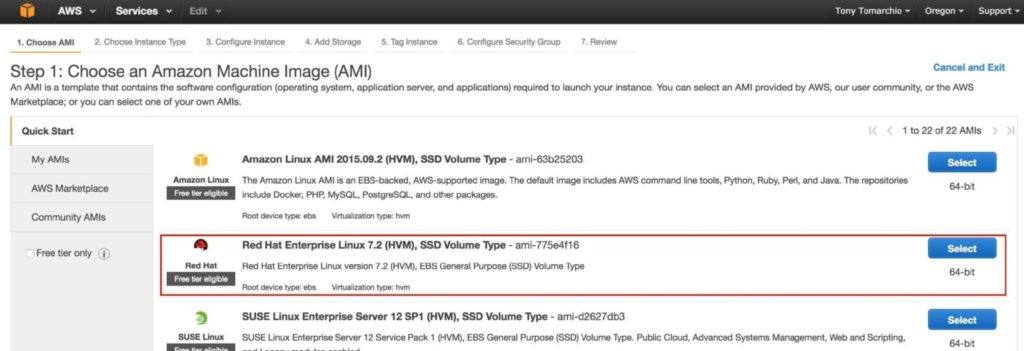
Select your linux distribution. The cluster software used later supports RHEL, SLES, CentOS and Oracle Linux. In this guide we will be using RHEL 7.X:
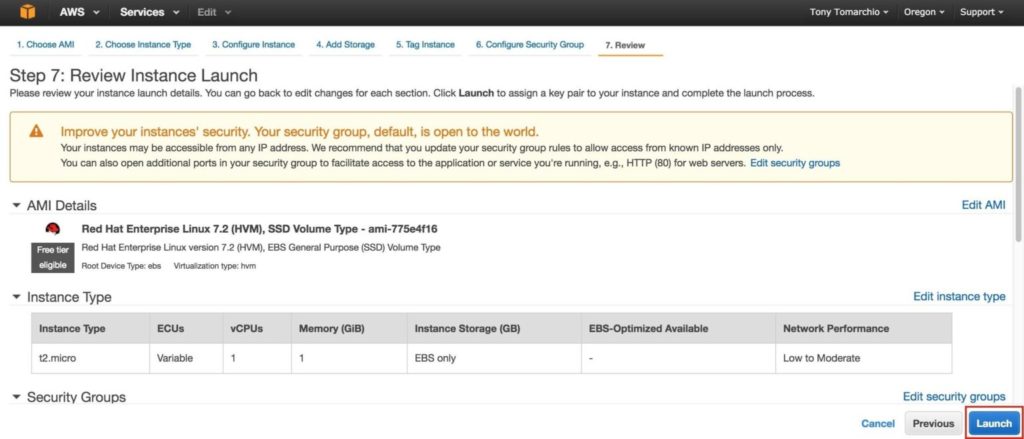
Size your instance accordingly. For the purposes of this guide and to minimize cost, t2.micro size was used because it’s free tier eligible. See here for more information on instance sizes and pricing.
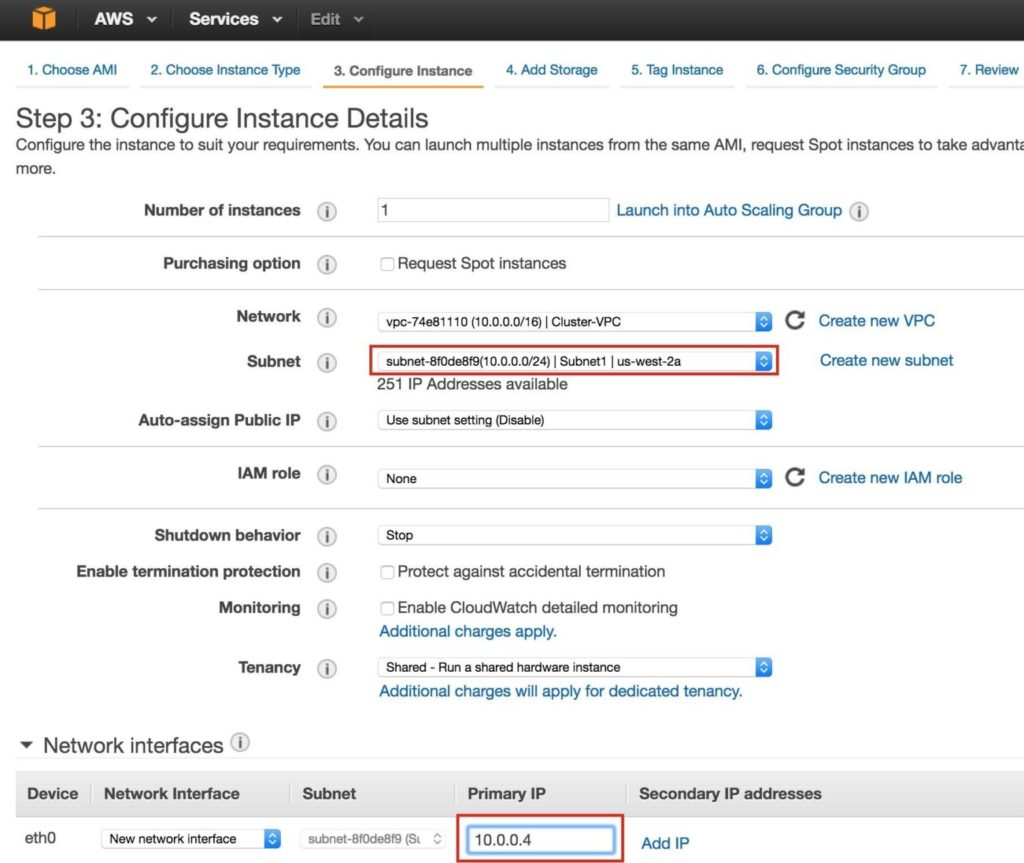
Next, configure instance details. IMPORTANT: make sure to launch this first instance (VM) into “Subnet1“, and define an IP address valid for the subnet (10.0.0.0/24) – below 10.0.0.4 is selected because it’s the first free IP in the subnet.
Next, add an extra disk to the cluster nodes (this will be done on both “node1” and “node2”). This disk will store our MySQL databases and the later be replicated between nodes. NOTE: You do NOT need to add an extra disk to the “witness” node. Only “node1” and “node2”. Add New Volume, and enter in the desired size:
Define a Tag for the instance, Node1:
Associate the instance with the existing security group, so the firewall rules created previous will be active:
Click Launch:
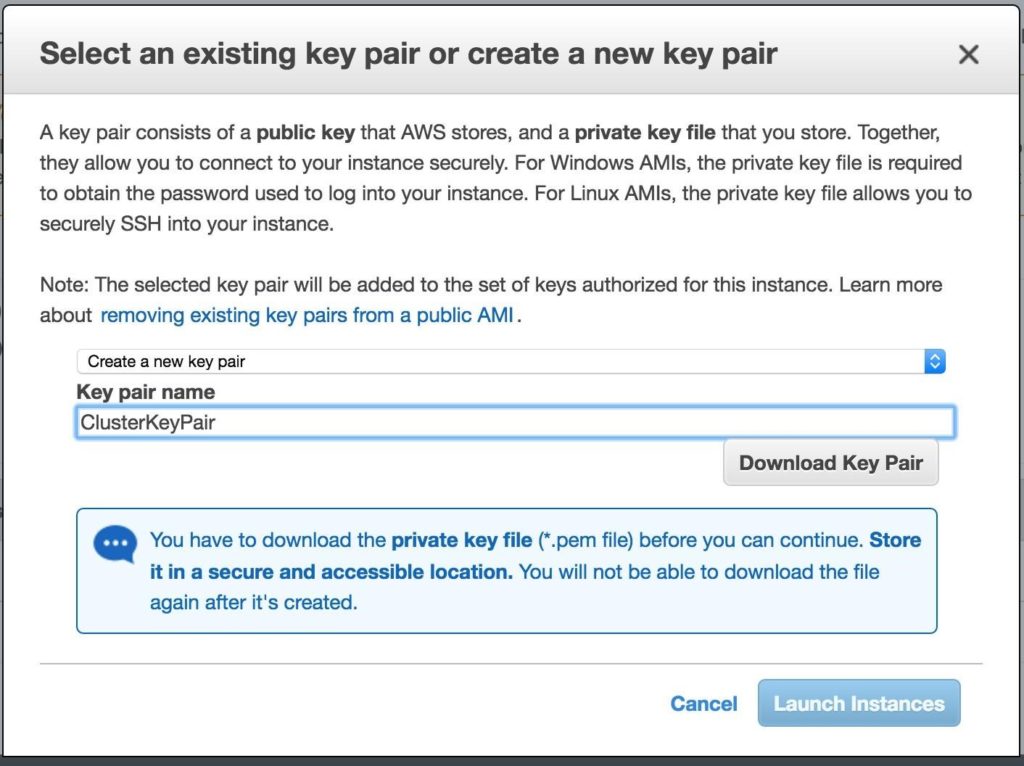
IMPORTANT: If this is the first instance in your AWS environment, you’ll need to create a new key pair. The private key file will need to be stored in a safe location as it will be required when you SSH into the linux instances.
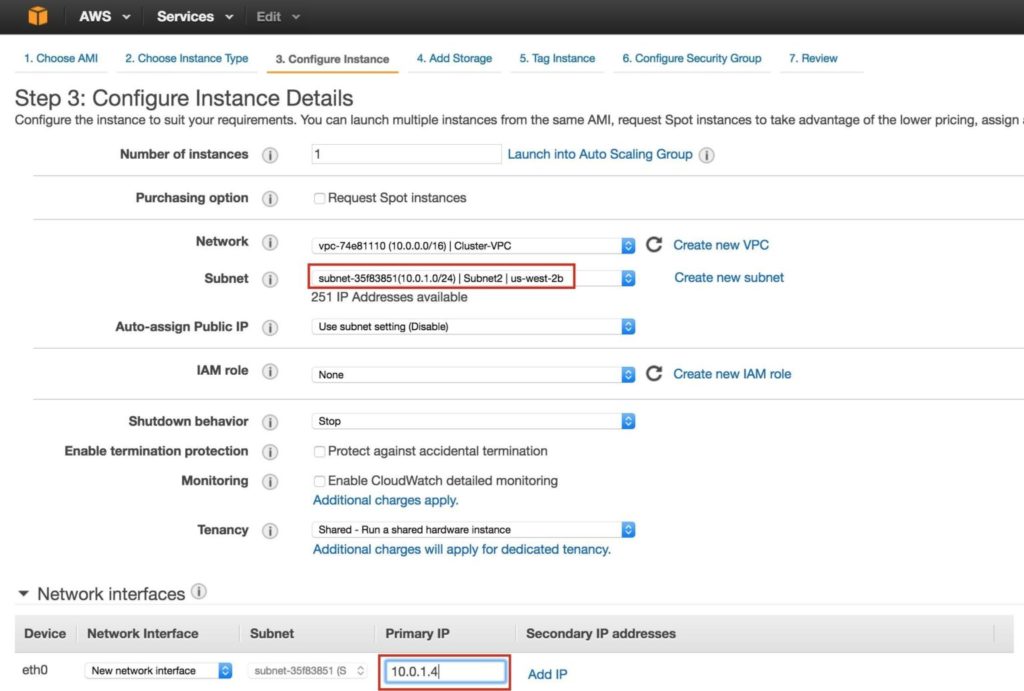
Create “node2” Repeat the steps above to create your second linux instance (node2). Configure it exactly like Node1. However, make sure that you deploy it into “Subnet2” (us-west-2b availability zone). The IP range for Subnet2 is 10.0.1.0/24, so an IP of 10.0.1.4 is used here:
Make sure to add a 2nd disk to Node2 as well. It should be the same exact size as the disk you added to Node1:
Give the second instance a tag…. “Node2”:
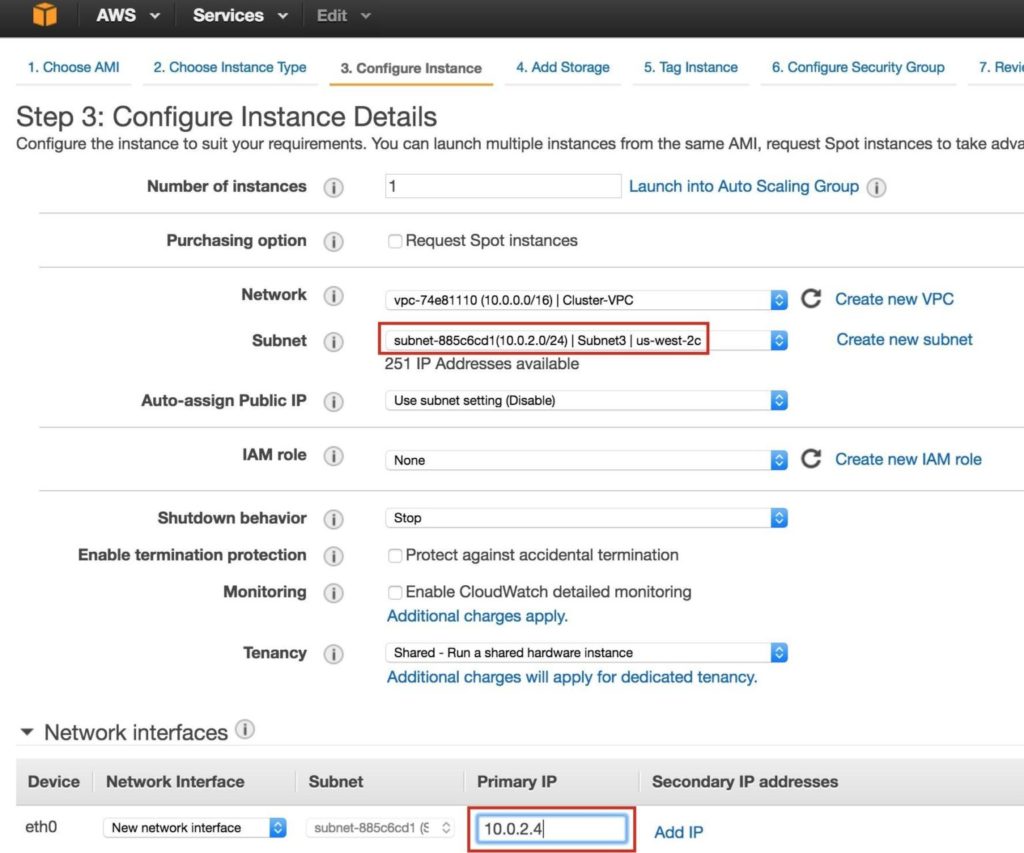
Create “witness” Repeat the steps above to create your third linux instance (witness). Configure it exactly like Node1&Node2, EXCEPT you DON’T need to add a 2nd disk, since this instance will only act as a witness to the cluster, and won’t ever bring MySQL online. Make sure that you deploy it into “Subnet3” (us-west-2c availability zone). The IP range for Subnet2 is 10.0.2.0/24, so an IP of 10.0.2.4 is used here:
NOTE: default disk configuration is fine for the witness node. A 2nd disk is NOT required:
Tag the witness node:
It may take a little while for your 3 instances to provision. Once complete, you’ll see then listed as running in your EC2 console:
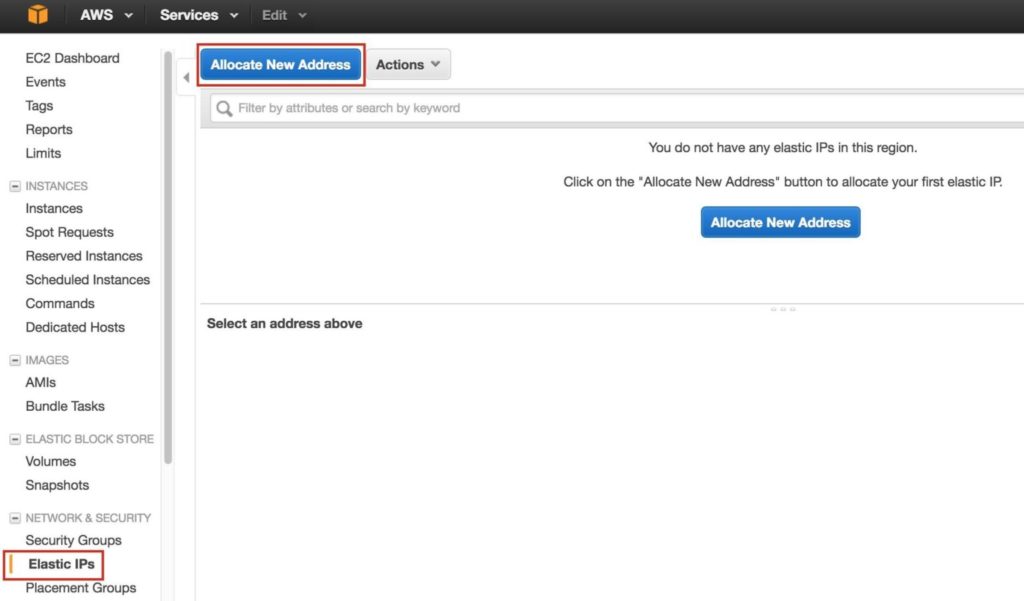
Step 7: Create Elastic IPNext, create an Elastic IP, which is a public IP address that will be used to connect into you instance from the outside world. Select Elastic IPs in the left menu, and then click “Allocate New Address”:
Select the newly created Elastic IP, right-click, and select “Associate Address”:
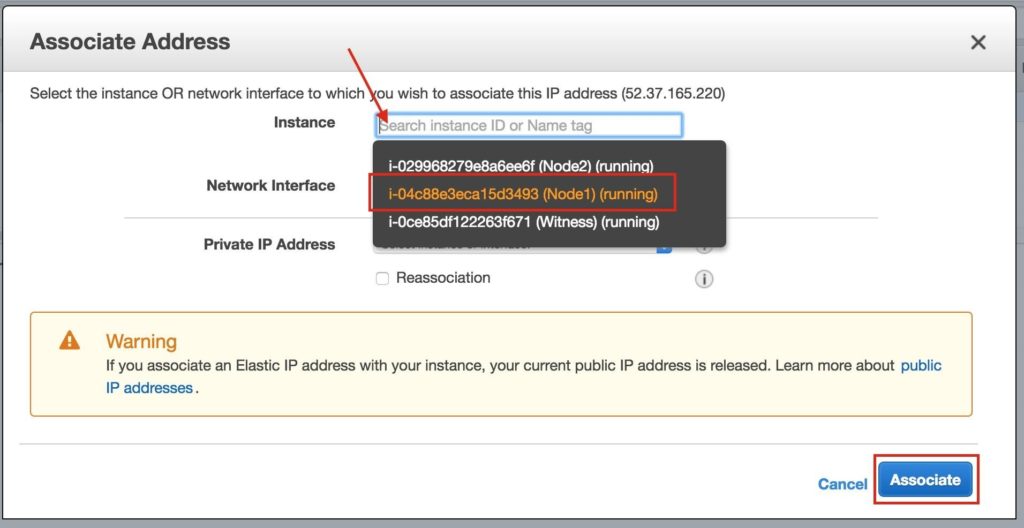
Associate this Elastic IP with Node1:
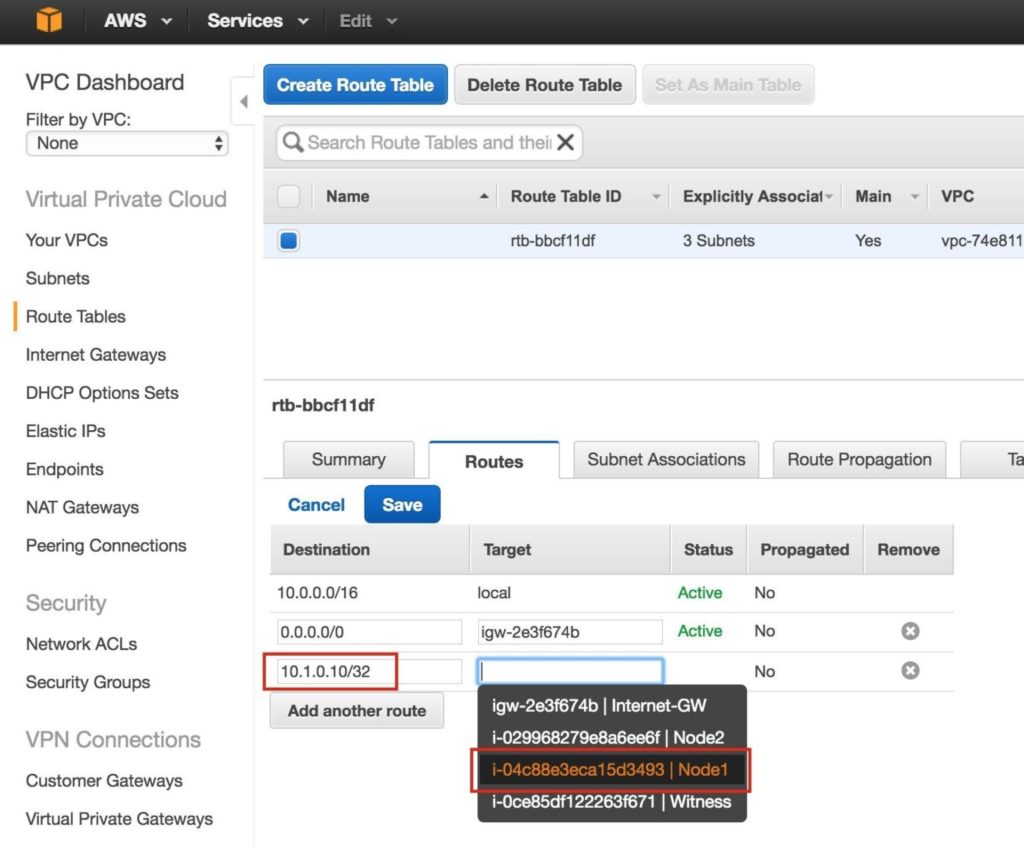
Repeat this for the other two instances if you want them to have internet access or be able to SSH/VNC into them directly. Step 8: create Route Entry for the Virtual IPAt this point all 3 instances have been created, and the route table will need to be updated one more time in order for the cluster’s Virtual IP to work. In this multi-subnet cluster configuration, the Virtual IP needs to live outside the range of the CIDR allocated to your VPC. Define a new route that will direct traffic to the cluster’s Virtual IP (10.1.0.10) to the primary cluster node (Node1) From the VPC Dashboard, select Route Tables, click Edit. Add a route for “10.1.0.10/32” with a destination of Node1: |
| August 11, 2020 |
Lessons in Cloud High Availability from the Movies |


