SIOS SANless clusters

SIOS SANless clusters High-availability Machine Learning monitoring

  • Home
  • Products
    • SIOS DataKeeper for Windows
    • SIOS Protection Suite for Linux
  • News and Events
  • Clustering Simplified
  • Success Stories
  • Contact Us
  • English
  • 中文 (中国)
  • 中文 (台灣)
  • 한국어
  • Bahasa Indonesia
  • ไทย

SIOS Announces New Version 8.8 of SIOS Protection Suite for Windows

October 5, 2021 by Jason Aw Leave a Comment

SIOS Announces New Version 8.8 of SIOS Protection Suite for Windows

SIOS Announces New Version 8.8 of SIOS Protection Suits for Windows

Enhanced HA Clustering for Business Critical Applications on AWS

SIOS is pleased to announce version 8.8 of SIOS Protection Suite for Windows – with innovations designed to make HA clustering in the cloud faster and easier.

SIOS Protection Suite for Windows includes SIOS Datakeeper Cluster Edition for efficient host-based, block level replication, SIOS LifeKeeper for application monitoring and failover orchestration, and a variety of application recovery kits for advanced, application-specific intelligence. SIOS DataKeeper can also be used independently  to add efficient replication to  Windows Server Failover Clustering environments for SANless clustering in the cloud.

Improved High Availability for Business Critical Applications on AWS

In version 8.8, SIOS has added several enhancements to SIOS Protection Suite to make creating and managing clusters in public clouds easy and error free. New features include:

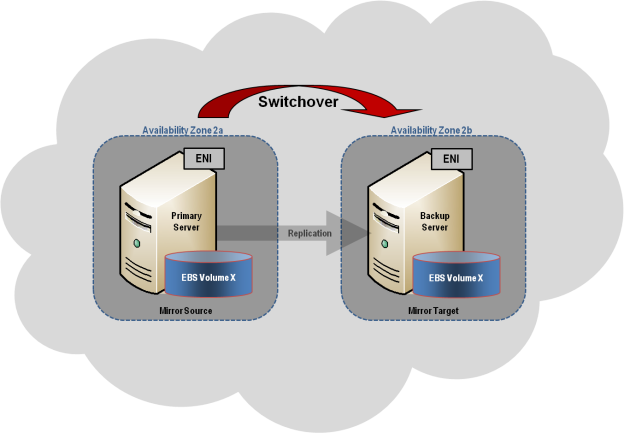
  • Application Recovery Kit (ARK) support of AWS Route 53 DNS Service and EC2 Elastic Compute Cloud services
    • Integration with these AWS services provides faster and more efficient recovery and access to protected applications after a switchover to a backup server in another AWS Region or Availability Zone.
    • SIOS ARKs automate the interaction with cloud services, reducing manual tasks and ensuring configuration accuracy
  • Streamlined failover of servers in Azure Cloud using the Internal Load Balancer (ILB)

These new features give enterprises additional confidence that the high availability they have always trusted from SIOS can be achieved in the public cloud, keeping applications and data safe and reducing downtime.

Reproduced from SIOS

Filed Under: Clustering Simplified Tagged With: SIOS

Deployment of a SQL Server Failover Cluster Instance on Huawei Cloud

September 28, 2021 by Jason Aw Leave a Comment

Huawei Cloud high availability ECS IaaS

Deployment of a SQL Server Failover Cluster Instance on Huawei Cloud

*DISCLAIMER: While the following completely covers the high availability portion within the scope of our product, this is a setup “guide” only and should be adapted to your own configuration.

Overview

HUAWEI CLOUD is a leading cloud service provider not just in China but also has global footprint with many datacenters around the world. They bring Huawei’s 30-plus years of expertise together in ICT infrastructure products and solutions and are committed to providing reliable, secure, and cost-effective cloud services to empower applications, harness the power of data, and help organizations of all sizes grow in today’s intelligent world. HUAWEI CLOUD is also committed to bringing affordable, effective, and reliable cloud and AI services through technological innovation.

DataKeeper Cluster Edition provides replication in a virtual private cloud (VPC) within a single region across availability zones for the Huawei cloud. In this particular SQL Server clustering example, we will launch four instances (one domain controller instance, two SQL Server instances and a quorum/witness instance) into three availability zones.

Huawei Cloud SIOS Datakeeper HA Architecture

DataKeeper Cluster Edition provides support for a data replication node outside of the cluster with all nodes in Huawei cloud. In this particular SQL Server clustering example, four instances are launched (one domain controller instance, two SQL Server instances and a quorum/witness instance) into three availability zones. Then an additional DataKeeper instance is launched in a second region including a VPN instance in both regions. Please see Configuration of Data Replication From a Cluster Node to External DR Site for more information. For additional information on using multiple regions please see Connecting Two VPCs in Different Regions.

Huawei Cloud SIOS Datakeeper DR architecture

DataKeeper Cluster Edition also provides support for a data replication node outside of the cluster with only the node outside of the cluster in Huawei Cloud. In this particular SQL Server clustering example, WSFC1 and WSFC2 are in an on-site cluster replicating to a Huawei Cloud instance. Then an additional DataKeeper instance is launched in a region in Huawei Cloud. Please see Configuration of Data Replication From a Cluster Node to External DR Site for more information.

Huawei Cloud SIOS Datakeeper Hybrid DR Architecture

Requirements

Description Requirement
Virtual Private Cloud In a single region with three availability zones
Instance Type Minimum recommended instance type: s3.large.2
Operating System See the DKCE Support Matrix
Elastic IP One elastic IP address connected to the domain controller
Four instances One domain controller instance, two SQL Server instances and one quorum/witness instance
Each SQL Server ENI (Elastic Network Interface) with 4 IPs

·         Primary ENI IP statically defined in Windows and used by DataKeeper Cluster Edition

·         Three IPs maintained by ECS while used by Windows Failover Clustering , DTC and SQLFC

Volumes Three volumes (EBS and NTFS only)

·         One primary volume (C drive)

·         Two additional volumes

o    One for Failover Clustering

o    One for MSDTC

Release Notes

Before beginning, make sure you read the DataKeeper Cluster Edition Release Notes for the latest information. It is highly recommended that you read and understand the DataKeeper Cluster Edition Installation Guide.

Create a Virtual Private Cloud (VPC)

A virtual private cloud is the first object you create when using DataKeeper Cluster Edition.

*A virtual Private Cloud (VPC) is an isolated private cloud consisting of a configurable pool of shared computing resources in a public cloud.

  1. Using the email address and password specified when signing up for Huawei Cloud, sign in to the Huawei Cloud Management Console.
  2. From the Services dropdown, select Virtual Private Cloud.

  1. On the right side of the screen, click on Create VPC and select the region that you want to use.
  2. Input the name that you want to use for the VPC
  3. Define your virtual private cloud subnet by entering your CIDR (Classless Inter-Domain Routing) as described below
  4. Input the subnet name, then click Create Now.

*A Route Table will automatically be created with a “main” association to the new VPC. You can use it later or create another Route Table.

*HELPFUL LINK:
Huawei’s Creating a Virtual Private Cloud (VPC)

Launch an Instance

The following walks you through launching an instance into your subnet. You will want to launch two instances into one availability zone, one for your domain controller instance and one for your SQL instance. Then you will launch another SQL instance into another availability zone and a quorum witness instance into yet another availability zone.

*HELPFUL LINKS:
Huawei Cloud ECS Instances

  1. Using the email address and password specified when signing up for Huawei Cloud, sign in to the Huawei Cloud Management Console.
  2. From the Service List dropdown, select Elastic Cloud Server.

  1. Select Buy ECS button and choose the Billing Mode, Region and AZ (Availability Zone) to deploy the Instance
  2. Select your Instance Type. (Note:Select s3.large.2 or larger.).
  3. Choose an Image. Under Public Image, select the Windows Server 2019 Datacenter 64bit English image
    1. For Configure Network, select your VPC.
    2. For Subnet, select an Subnet that you want to use, select Manually-specified IP address and input the IP address that you want to use
    3. Select the Security Group to use or Edit and select an existing one.
    4. Assign an EIPif you need the ECS instance to access the internet
    5. Click Configure Advanced Settings and provide a name for the ECS, use Password for Login Mode and provide the secure password for Administrator login
    6. Click Configure Now on Advanced Options Add a Tag to name your instance and Click on Confirm
  4. Perform final review of the Instance and click on Submit.

*IMPORTANT: Make a note of this initial administrator password. It will be needed to log on to your instance.

Repeat the above steps for all instances.

Connect to Instances

You can connect to your domain controller instance via Remote Login from the ECS pane.

Login as administrator and enter your administrator password.

*BEST PRACTICE: Once logged on, it is best practice to change your password.

Configure the Domain Controller Instance

Now that the instances have been created, we started with setting up the Domain Service instance.

This guide is not a tutorial on how to set up an Active Domain server instance. We recommend reading articles on how to set up and configure an Active Directory server. It is very important to understand that even though the instance is running in a Huawei cloud, this is a regular installation of Active Directory.

Static IP Addresses

Configure Static IP Addresses for your Instances

  1. Connect to your domain controller instance.
  2. Click Start/ Control Panel.
  3. Click Network and Sharing Center.
  4. Select your network interface.
  5. Click Properties.
  6. Click Internet Protocol Version 4 (TCP/IPv4), then Properties.
  7. Obtain your current IPv4 address, default gateway and DNS server for the network interface from Amazon.
  8. In the Internet Protocol Version 4 (TCP/IPv4) Properties dialog box, under Use the following IP address, enter your IPv4 address.
  9. In the Subnet mask box, type the subnet mask associated with your virtual private cloud subnet.
  10. In the Default Gateway box, type the IP address of the default gateway and then click OK.
  11. For the Preferred DNS Server, enter the Primary IP Address of Your Domain Controller(ex. 15.0.1.72).
  12. Click Okay, then select Close. Exit Network and Sharing Center.
  13. Repeat the above steps on your other instances.

Join the Two SQL Instances and the Witness Instance to Domain

*Before attempting to join a domain make these network adjustments. On your network adapter, Add/Change the Preferred DNS server to the new Domain Controller address and its DNS server. Use ipconfig /flushdns to refresh the DNS search list after this change. Do this before attempting to join the Domain.

*Ensure that Core Networking and File and Printer Sharing options are permitted in Windows Firewall.

  1. On each instance, click Start, then right-click Computer and select Properties.
  2. On the far right, select Change Settings.
  3. Click on Change.
  4. Enter a new Computer Name.
  5. Select Domain.
  6. Enter Domain Name– (ex. docs.huawei.com).
  7. Click Apply.

*Use Control Panel to make sure all instances are using the correct time zone for your location.

*BEST PRACTICE: It is recommend that the System Page File is set to system managed (not automatic) and to always use the C: drive.

Control Panel > Advanced system settings > Performance > Settings > Advanced > Virtual Memory. Select System managed size, Volume C: only, then select Set to save.

Assign Secondary Private IPs to the Two SQL Instances

In addition to the Primary IP, you will need to add three additional IPs (Secondary IPs) to the elastic network interface for each SQL instance.

  1. From the Service List dropdown, select Elastic Cloud Server.
  2. Click the instance for which you want to add secondary private IP addresses.
  3. Select NICs > Manage Virtual IP Address.
  4. Click on Assign Virtual IP address and select Manual enter an IP address that is within the subnet range for the instance (ex. For 15.0.1.25, enter 15.0.1.26). Click Ok.
  5. Click on the More dropdown on the IP address row, and select Bind to Server, select the server to bind the IP address to, and the NIC card.
  6. Click OK to save your work.
  7. Perform the above on both SQL Instances.

*HELPFUL LINKS:
Managing Virtual IP Addresses
Binding a Virtual IP Address to an EIP or ECS

Create and Attach Volumes

DataKeeper is a block-level volume replication solution and requires that each node in the cluster have additional volume(s) (other than the system drive) that are the same size and same drive letters. Please review Volume Considerations for additional information regarding storage requirements.

Create Volumes

Create two volumes in each availability zone for each SQL server instance, a total of four volumes.

  1. From the Service List dropdown, select Elastic Cloud Server.
  2. Click the instance for which you want to manage
  3. Go to the Disks tab
  4. Click Add Disk to add a new volume of your choice and size, make sure you select the volume in the same AZ as the SQL server that you intend to attach it to
  5. Select the check box to agree to the SLA and Submit
  6. Click Back to Server Console
  7. Attach the disk if necessary to the SQL instance
  8. Do this for all four volumes.

*HELPFUL LINKS:
Elastic Volume Service

Configure the Cluster

Prior to installing DataKeeper Cluster Edition, it is important to have Windows Server configured as a cluster using either a node majority quorum (if there is an odd number of nodes) or a node and file share majority quorum (if there is an even number of nodes). Consult the Microsoft documentation on clustering in addition to this topic for step-by-step instructions. Note: Microsoft released a hotfix for Windows 2008R2 that allows disabling of a node’s vote which may help achieve a higher level of availability in certain multi-site cluster configurations.

Add Failover Clustering

Add the Failover Clustering feature to both SQL instances.

  1. Launch Server Manager.
  2. Select Features in the left pane and click Add Features in the Features This starts the Add Features Wizard.
  3. Select Failover Clustering.
  4. Select Install.

Validate a Configuration

  1. Open Failover Cluster Manager.
  2. Select Failover Cluster Manager, select Validate a Configuration.
  3. Click Next, then add your two SQL instances.

Note: To search, select Browse, then click on Advanced and Find Now. This will list available instances.

  1. Click Next.
  2. Select Run Only Tests I Select and click Next.
  3. In the Test Selection screen, deselect Storage and click Next.
  4. At the resulting confirmation screen, click Next.
  5. Review Validation Summary Report then click Finish.

Create Cluster

  1. In Failover Cluster Manager, click on Create a Cluster then click Next.
  2. Enter your two SQL instances.
  3. On the Validation Warning page, select No then click Next.
  4. On the Access Point for Administering the Cluster page, enter a unique name for your WSFC Cluster. Then enter the Failover Clustering IP address for each node involved in the cluster. This is the first of the three secondary IP addresses added previously to each instance.
  5. IMPORTANT!Uncheck the “Add all available storage to the cluster” checkbox. DataKeeper mirrored drives must not be managed natively by the cluster. They will be managed as DataKeeper Volumes.
  6. Click Next on the Confirmation
  7. On Summary page, review any warnings then select Finish.

Configure Quorum/Witness

  1. Create a folder on your quorum/witness instance (witness).
  2. Share the folder.
    1. Right-click folder and select Share With / Specific People….
    2. From the dropdown, select Everyone and click Add.
    3. Under Permission Level, select Read/Write.
    4. Click Share, then Done. (Make note of the path of this file share to be used below.)
  3. In Failover Cluster Manager, right-click cluster and choose More Actions and Configure Cluster Quorum Settings. Click Next.
  4. On the Select Quorum Configuration, choose Node and File Share Majority and click Next.
  5. On the Configure File Share Witness screen, enter the path to the file share previously created and click Next.
  6. On the Confirmation page, click Next.
  7. On the Summary page, click Finish.

Install and Configure DataKeeper

After the basic cluster is configured but prior to any cluster resources being created, install and license DataKeeper Cluster Edition on all cluster nodes. See the DataKeeper Cluster Edition Installation Guide for detailed instructions.

  1. Run DataKeeper setup to install DataKeeper Cluster Edition on both SQL instances.
  2. Enter your license key and reboot when prompted.
  3. Launch the DataKeeper GUI and connect to server.

*Note: The domain or server account used must be added to the Local System Administrators Group. The account must have administrator privileges on each server that DataKeeper is installed on. Refer to DataKeeper Service Log On ID and Password Selection for additional information.

  1. Right click on Jobs and connect to both SQL servers.
  2. Create a Job for each mirror you will create. One for your DTC resource, and one for your SQL resource..
  3. When asked if you would like to auto-register the volume as a cluster volume, select Yes.

*Note: If installing DataKeeper Cluster Edition on Windows “Core” (GUI-less Windows), make sure to read Installing and Using DataKeeper on Windows 2008R2/2012 Server Core Platforms for detailed instructions.

Configure MSDTC

  1. For Windows Server 2012 and 2016, in the Failover Cluster Manager GUI, select Roles, then select Configure Role.
  2. Select Distributed Transaction Coordinator (DTC), and click Next.

*For Windows Server 2008, in the Failover Cluster Manager GUI, select Services and Applications, then select Configure a Service or Application and click Next.

  1. On the Client Access Point screen, enter a name, then enter the MSDTC IP address for each node involved in the cluster. This is the second of the three secondary IP addresses added previously to each instance. Click Next.
  2. Select the MSDTC volume and click Next.
  3. On the Confirmation page, click Next.
  4. Once the Summary page displays, click Finish.

Install SQL on the First SQL Instance

  1. On the domain controller server create a folder and share it..
    1. For example “TEMPSHARE” with Everyone permission.
  2. Create a sub folder “SQL” and copy the SQL .iso installer into that sub folder.
  3. On the SQL server, create a network drive and attach it to the shared folder on the domain controller.
    • . For example “net use S: \\\TEMPSHARE
  4. On the SQL server the S: drive will appear. CD to the SQL folder and find the SQL .iso installer. Right click on the .iso file and select Mount. The setup.exe installer will appear with the SQL .iso installer.

F:\>Setup /SkipRules=Cluster_VerifyForErrors /Action=InstallFailoverCluster

  1. On Setup Support Rules, click OK.
  2. On the Product Key dialog, enter your product key and click Next.
  3. On the License Terms dialog, accept the license agreement and click Next.
  4. On the Product Updates dialog, click Next.
  5. On the Setup Support Files dialog, click Install.
  6. On the Setup Support Rules dialog, you will receive a warning. Click Next, ignoring this message, since it is expected in a multi-site or non-shared storage cluster.
  7. Verify Cluster Node Configuration and click Next.
  8. Configure your Cluster Network by adding the “third” secondary IP address for your SQL instance and click Next. Click Yes to proceed with multi-subnet configuration.
  9. Enter passwords for service accounts and click Next.
  10. On the Error Reporting dialog, click Next.
  11. On the Add Node Rules dialog, skipped operation warnings can be ignored. Click Next.
  12. Verify features and click Install.
  13. Click Close to complete the installation process.

Install SQL on the Second SQL Instance

Installing the second SQL instance is similar to the first one.

  1. On the SQL server, create a network drive and attach it to the shared folder on the domain controller as explained above for the first SQL server.
  2. Once the .iso installer is mounted, run SQL setup once again from the command line in order to skip the Validate Open a Command window, browse to your SQL install directory and type the following command:

Setup /SkipRules=Cluster_VerifyForErrors /Action=AddNode /INSTANCENAME=”MSSQLSERVER”

(Note: This assumes you installed the default instance on the first node)

  1. On Setup Support Rules, click OK.
  2. On the Product Key dialog, enter your product key and click Next.
  3. On the License Terms dialog, accept the license agreement and click Next.
  4. On the Product Updates dialog, click Next.
  5. On the Setup Support Files dialog, click Install.
  6. On the Setup Support Rules dialog, you will receive a warning. Click Next, ignoring this message, since it is expected in a multi-site or non-shared storage cluster.
  7. Verify Cluster Node Configuration and click Next.
  8. Configure your Cluster Network by adding the “third” secondary IP address for your SQL Instance and click Next. Click Yes to proceed with multi-subnet configuration.
  9. Enter passwords for service accounts and click Next.
  10. On the Error Reporting dialog, click Next.
  11. On the Add Node Rules dialog, skipped operation warnings can be ignored. Click Next.
  12. Verify features and click Install.
  13. Click Close to complete the installation process.

Common Cluster Configuration

This section describes a common 2-node replicated cluster configuration.

  1. The initial configuration must be done from the DataKeeper UI running on one of the cluster nodes. If it is not possible to run the DataKeeper UI on a cluster node, such as when running DataKeeper on a Windows Core only server, install the DataKeeper UI on any computer running Windows XP or higher and follow the instruction in the Core Only section for creating a mirror and registering the cluster resources via the command line.
  2. Once the DataKeeper UI is running, connect to each of the nodes in the cluster.
  3. Create a Job using the DataKeeper UI. This process creates a mirror and adds the DataKeeper Volume resource to the Available Storage.

!IMPORTANT: Make sure that Virtual Network Names for NIC connections are identical on all cluster nodes.

  1. If additional mirrors are required, you can Add a Mirror to a Job.
  2. With the DataKeeper Volume(s)now in Available Storage, you are able to create cluster resources (SQL, File Server, etc.) in the same way as if there were a shared disk resource in the cluster. Refer to Microsoft documentation for additional information in addition to the above for step-by-step cluster configuration instructions.

Connectivity to the cluster (virtual) IPs

In addition to the Primary IP and secondary IP, you will also need to configure the virtual IP addresses in the Huawei Cloud so that they can be routed to the active node.

  1. From the Service List dropdown, select Elastic Cloud Server.
  2. Click on one of the SQL instance for which you want to add cluster virtual IP address (one for MSDTC, one for SQL Failover Cluster)
  3. Select NICs > Manage Virtual IP Address.
  4. Click on Assign Virtual IP address and select Manual enter an IP address that is within the subnet range for the instance (ex. For 15.0.1.25, enter 15.0.1.26). Click Ok.
  5. Click on the More dropdown on the IP address row, and select Bind to Server, select both the server to bind the IP address to, and the NIC card.
  6. Use the same steps 4. and 5 for the MSDTC and SQLFC virtual IPs
  7. Click OKto save your work.

Management

Once a DataKeeper volume is registered with Windows Server Failover Clustering, all of the management of that volume will be done through the Windows Server Failover Clustering interface. All of the management functions normally available in DataKeeper will be disabled on any volume that is under cluster control. Instead, the DataKeeper Volume cluster resource will control the mirror direction, so when a DataKeeper Volume comes online on a node, that node becomes the source of the mirror. The properties of the DataKeeper Volume cluster resource also display basic mirroring information such as the source, target, type and state of the mirror.

Troubleshooting

Use the following resources to help troubleshoot issues:

  • Troubleshooting issues section
  • For customers with a support contract – http://us.sios.com/support/overview/
  • For evaluation customers only – Pre-sales support

Additional Resources:

Step-by-Step: Configuring a 2-Node Multi-Site Cluster on Windows Server 2008 R2 – Part 1 — http://clusteringformeremortals.com/2009/09/15/step-by-step-configuring-a-2-node-multi-site-cluster-on-windows-server-2008-r2-%E2%80%93-part-1/

Step-by-Step: Configuring a 2-Node Multi-Site Cluster on Windows Server 2008 R2 – Part 3 — http://clusteringformeremortals.com/2009/10/07/step-by-step-configuring-a-2-node-multi-site-cluster-on-windows-server-2008-r2-%E2%80%93-part-3/

Filed Under: Blog posts, Clustering Simplified, Datakeeper Tagged With: #SANLess Clusters for SQL Server Environments, #SANLess Clusters for Windows Environments, disaster recovery, ECS, High Availability, Huawei Cloud, SQL Server Failover Cluster

Beginning Well is Great, But Maintaining Uptime Takes Vigilance

September 28, 2021 by Jason Aw Leave a Comment

Beginning Well is Great, But Maintaining Uptime Takes Vigilance


Beginning Well is Great, But Maintaining Uptime Takes Vigilance

Author Isabella Poretsis states, “Starting something can be easy, it is finishing it that is the highest hurdle.” It is great to have a kickoff meeting.  It is invigorating, and exciting. Managers and leaders look out at the greenfield with excitement and optimism is high.  But, this moment of kickoff, and even the Champagne popping moment of a successful deployment are but just the beginning. Maintaining uptime requires ongoing vigilance.

High availability and the elusive four nines of uptime for your critical applications and databases aren’t momentary occurrences, but rather, a constant endeavor to end the little foxes that destroy the vineyard.  Staying abreast of threats, up-to-date on the updates, and properly trained and prepared is the work from which your team “is never entitled to take a vacation.”

For those who want to stay vigilant in maintaining uptime, here are five tips:

1. Monitor the Environment 

Very little in enterprise software still follows the “set it and forget it” mindset.  Everything, since the day you uncorked the grand opening champagne to now, has been moving toward a state of decline.  If you aren’t monitoring the servers, workloads, network traffic, and hardware (virtual or physical), you may lose uptime and stability.

2. Perform Maintenance

One thing that I have always noticed in over twenty plus years of software development and services is that all software comes with updates.  Apply them.  Remember to execute sound maintenance policies, including taking and verifying backups. One tech writer suggested the only update you regret is the one you failed to make.

3. Learn Continuously

My first introduction to high availability came when I unplugged one end of the Token Ring for a server in our lab as an intern, fresh from the CE-211 lab.  The administrator was in my face in minutes.  After an earful, he gave me an education.  Ideally, you and your team want to learn without taking down your network, but you do absolutely want to keep learning.  Look into paid courses on existing technology, new releases, emerging infrastructure.  Check your vendors for courses and items related to your process, environment, software deployments and company enterprise.  Free courses for many things also exist if money is an issue.

4. Multiply the learning

In addition to continuous learning, make a plan to multiply the learning.  As the VP of Customer Experience at SIOS we have seen the tremendous difference between teams who share their learning and those who don’t.  Teams that share their learning avoid gaps in knowledge that compromise downtime.  The best way to know that you learned something is to teach it to somebody else. As you learn, share the learning with team members to reduce the risk of downtime due to error, and for that matter vacation.

5. End well . . .before the next beginning

All projects, servers, and software have an ending.  End well.  Decommission correctly.  Begin the next phase, deployment, software relationship, etc well by closing up loose ends, documenting what went well, what did not, and what to do next.  Treat your existing vendors well.  You just may need them again later.  Understand the existing systems and high availability solutions before proceeding with a new deployment.  This proper ending helps you begin again from a better starting place headed towards a stronger outcome.

Keeping the system highly available is a continuous process.  Set it and forget it is a nice catch phrase, but the reality is that uptime takes vigilance, continual monitoring, proper maintenance, and constant.

-Cassius Rhue, VP, Customer Experience

Reproduced with permission from SIOS

Filed Under: Clustering Simplified Tagged With: Application availability, clusters, disaster recovery, High Availability

Understanding and Avoiding Split Brain Scenarios

September 23, 2021 by Jason Aw Leave a Comment

Understanding and Avoiding Split Brain Scenarios

Understanding and Avoiding Split Brain Scenarios

Split brain. Most readers of our blogs will have heard the term, in the computing context that is, yet we cannot help but to sympathize with those whose first mental image is of the chaos that would result if someone had two brains, both equally in control at the same time.

What is a Failover Cluster Split Brain Scenario?

In a failover cluster split brain scenario, neither node can communicate with the other, and the standby server may promote itself to become an active server because it believes the active node has failed. This results in both nodes becoming ‘active’ as each would see the other as being failed. As a result, data integrity and consistency is compromised as data on both nodes would be changing. This is referred to as split brain.

There are two types of split-brain scenarios which may occur for an SAP HANA resource hierarchy if appropriate steps are not taken to avoid them.

  • HANA Resource Split Brain: The HANA resource is Active (ISP) on multiple cluster nodes. This situation is typically caused by a temporary network outage affecting the communication paths between cluster nodes.
  • SAP HANA System Replication Split Brain: The HANA resource is Active (ISP) on the primary node and Standby (OSU) on the backup node, but the database is running and registered as the primary replication site on both nodes. This situation is typically caused by either a failure to stop the database on the previous primary node during failover, having Autostart enabled for the database, or a database administrator manually running “hdbnsutil -sr_takeover” on the secondary replication site outside of the clustering software environment.

Avoiding Split Brain Issues

Recommendations for avoiding or resolving each type of split-brain scenario in the SIOS Protection Suite clustering environment are given below.

While in a split-brain scenario, a message similar to the following is logged and broadcast to all open consoles every quickCheck interval (default 2 minutes) until the issue is resolved.

EMERG:hana:quickCheck:HANA-SPS_HDB00:136363:WARNING: 
A temporary communication failure has occurred between servers 
hana2-1 and hana2-2. 
Manual intervention is required in order to minimize the risk of 
data loss. 
To resolve this situation, please take one of the following resource 
hierarchies out of service: HANA-SPS_HDB00 on hana2-1 
or HANA-SPS_HDB00 on hana2-2. 
The server that the resource hierarchy is taken out of service on 
will become the secondary SAP HANA System Replication site.

Recommendations for resolution:

  1. Investigate the database on each cluster node to determine which instance contains the most up-to-date or relevant data. This determination must be made by a qualified database administrator who is familiar with the data.
  2. The HANA resource on the node containing the data that needs to be retained will remain Active (ISP) in LifeKeeper, and the HANA resource hierarchy on the node that will be re-registered as the secondary replication site will be taken entirely out of service in LifeKeeper. Right-click on each leaf resource in the HANA resource hierarchy on the node where the hierarchy should be taken out of service and click Out of Service …
  3. Once the SAP HANA resource hierarchy has been successfully taken out of service, LifeKeeper will re-register the Standby node as the secondary replication site during the next quickCheck interval (default 2 minutes). Once replication resumes, any data on the Standby node which is not present on the Active node will be lost. Once the Standby node has been re-registered as the secondary replication site, the SAP HANA hierarchy has returned to a highly available state.

SAP HANA System Replication Split Brain Resolution

While in this split-brain scenario, a message similar to the following is logged and broadcast to all open consoles every quick. Check interval (default 2 minutes) until the issue is resolved.

EMERG:hana:quickCheck:HANA-SPS_HDB00:136364:WARNING: 
SAP HANA database HDB00 is running and registered as 
primary master on both hana2-1 and hana2-2. 
Manual intervention is required in order to 
minimize the risk of data loss. To resolve this situation, 
please stop database instance 
HDB00 on hana2-2 by running the command ‘su – spsadm -c 
“sapcontrol -nr 00 -function Stop”’ 
on that server. Once stopped, 
it will become the secondary SAP HANA System Replication site.

Recommendations for resolution:

  1. Investigate the database on each cluster node to determine whether important data exists on the Standby node which does not exist on the Active node. If important data has been committed to the database on the Standby node while in the split-brain state, the data will need to be manually copied to the Active node. This determination must be made by a qualified database administrator who is familiar with the data.
  2. Once any missing data has been copied from the database on the Standby node to the Active node, stop the database on the Standby node by running the command given in the LifeKeeper warning message:

    su – adm -c “sapcontrol -nr <Inst#> -function Stop”

    where is the lower-case SAP System ID for the HANA installation and <Inst#> is the instance number for the HDB instance (e.g., the instance number, for instance, HDB00 is 00)

  3. Once the database has been successfully stopped, LifeKeeper will re-register the Standby node as the secondary replication site during the next quickCheck interval (default 2 minutes). Once replication resumes, any data on the Standby node which is not present on the Active node will be lost. Once the Standby node has been re-registered as the secondary replication site, the SAP HANA hierarchy has returned to a highly available state.

Being aware of common split-brain scenarios and taking these steps to mitigate them can save you time and protect data integrity.

Reproduced with permission from SIOS

Filed Under: Clustering Simplified Tagged With: high availability - SAP, Linux, SAP S/4HANA, split brain

High Availability Architecture and Best Practices

September 16, 2021 by Jason Aw Leave a Comment

High Availability Architecture and Best Practices

High Availability Architecture and Best Practices

13 Little Known Facts about High Availability

1. Hypervisor HA is not the Same as Application HA

A key misconception is that I have high availability because I have redundancy in my hardware or hypervisor. However, hardware and hypervisor redundancy does not guarantee high availability for applications. It is also not a guarantee that orchestration of applications will be properly executed in a failure.

2. In High Availability, Bigger Does Not Equal Better

If you are a powerlifter, bigger weights are better and smaller reps are better. Or, if we are talking about hugs. (You remember hugs are the things that we used to do when we saw a friend from a different town, that we hadn’t seen in a while.) But, bigger doesn’t always mean better. A bigger kidney stone, for example, is definitely not better. In higher availability, creating a bigger, more complex solution doesn’t always mean that you’ll have increased your high availability. It might mean you have the same availability or less. It may also mean that you have a bigger, more complex system with a lot of moving pieces to sort through in an outage.

3. Everything fails… sometimes

Application programming languages date back to the 1950’s. And while the languages, processors, IDEs, and quality of the code has improved, the reality is “all applications fail at some point.” Failures due to exceptions, bugs, unhandled terminations, accidental terminations, resource exhaustion, and more happen. Having an active/active, or active/passive application availability strategy is still necessary.

4. Focus on ‘why’ as much as ‘how’

Our natural tendency to jump into task completion mode is a necessary asset, but it needs to be tempered and guided by the answer to our questions of why. Adding a solution to an environment without understanding the business, application, database, and stakeholder requirements will lead to either a:

  • Failure
  • Over expenditures
  • Underperformance
  • Confusion and over architecture
  • All of the above

Instead of focusing solely on getting availability implemented, spend the necessary resources and effort to understand the business needs and answers to “why”

5. Unpatched issues are a common source of regret

If you do or you don’t you will have consequences. The consequence of all unpatched issues is regret. As VP of Customer Experience I have seen firsthand the downtime caused by customers failing to address known issues in a timely manner.

6. Undocumented issues cause downtime too

Picture the scene. A new admin is looking into servers on the network. The usage reports indicate the server is not active and no clients are connected. Not recognizing the server and finding no “tags”, documentation or other identifiers, the new admin believes that it should be shut down. Unfortunately the undocumented and uncommunicated instance is actually a standby server whose removal will cause downtime when the primary crashes unexpectedly. This isn’t a fictional story, this is the true story of a new admin who incorrectly identified a server as an idle QA system and shut it down prior to a patching exercise.

7. Complacency is also an enemy

We’d all love it if availability on premises or in the cloud, or anywhere in between was something that we can “set and forget.” But, few, if anything in life is really as simple as “set it and forget it.” One of the biggest enemies of your availability in the future, is your success with high availability now. When disasters are few and far between, and teams feel confident that they have realized sustained stability, complacency can step in. Success tempts us to think nothing is going to change, and complacency in respect to high availability therefore is an enemy to high availability. Things around your enterprise and within your enterprise are changing. The cloud is changing, your business needs are changing, and the applications and Operating Systems are also changing.

8. Change is hard

Change is hard. Just ask anyone with a sweet tooth who’s been trying to give up that second slice of cake before bedtime. Similar resistance occurs even in high availability. Teams, even those who experience disasters, are often reluctant to change even if the change is good. They need a vision, an understanding of why, and support. Other teams, those with solutions in place, are reluctant to improve high availability with fear of introducing instability or exposing themselves to new risk.

9. All change is not good change

Change is good, when change is good. When considering a change to the higher availability solution and architecture it is critical that changes are analyzed against the goals, the requirements, and within the scope of increasing availability. Changes that increase stability, add protection for critical components, eliminate workarounds, optimize the availability of services and are thoroughly tested are good changes.

10. Cheaper is not always better

Cheaper is not always better. While cheaper solutions typically have a lower price tag, they may also come with a number of limitations that make them less than ideal. When there is a lower price tag, beware of missing features such as a lack of application awareness, limited orchestration, hidden complexity, manual recovery and failover, and limited to no user validation. Cheaper solutions may also fail to include customer support. Be sure to understand whether your cheaper solution includes support, or if the support is an additional, and substantial addon cost.

The same applies to cheaper deployments with reduced compute, disk or storage. While the price tag and monthly cost might be lower, your solution may also be functioning at a less than ideal capacity.

11. Loud does not equal effective

Ever heard the story of the boy that cried wolf. An application monitoring solution that produces an alert storm is sooner than later a solution that gets ignored. Having a solution that provides alerts is great, but if that solution triggers critical alerts in error or in excess, it is ineffective.

12. High Availability is a culture and a mindset, not just a product or hardware solution

Software, hardware, processes, solutions and services are all a part of high availability. However, without a buy-in across IT functions and business units, it will be fraught with frustration and constantly the source of budget discussions instead of discussions on value, business stability, increased customer satisfaction, and diminished risk.

13. Now is not too late

Hope is not a strategy for high availability, nor does hoping that you will not have a critical disaster or application failure need to be a strategy. Designing and architecting a highly available enterprise architecture can be made possible now, even if it has been weeks or months since the last disaster.

Contact SIOS to learn more about high availability solutions for your application.

– Cassius Rhue, VP, Customer Experience

Reproduced from SIOS

Filed Under: Clustering Simplified Tagged With: High Availability

  • « Previous Page
  • 1
  • …
  • 51
  • 52
  • 53
  • 54
  • 55
  • …
  • 104
  • Next Page »

Recent Posts

  • Transitioning from VMware to Nutanix
  • Are my servers disposable? How High Availability software fits in cloud best practices
  • Data Recovery Strategies for a Disaster-Prone World
  • DataKeeper and Baseball: A Strategic Take on Disaster Recovery
  • Budgeting for SQL Server Downtime Risk

Most Popular Posts

Maximise replication performance for Linux Clustering with Fusion-io
Failover Clustering with VMware High Availability
create A 2-Node MySQL Cluster Without Shared Storage
SAP for High Availability Solutions For Linux
Bandwidth To Support Real-Time Replication
The Availability Equation – High Availability Solutions.jpg
Choosing Platforms To Replicate Data - Host-Based Or Storage-Based?
Guide To Connect To An iSCSI Target Using Open-iSCSI Initiator Software
Best Practices to Eliminate SPoF In Cluster Architecture
Step-By-Step How To Configure A Linux Failover Cluster In Microsoft Azure IaaS Without Shared Storage azure sanless
Take Action Before SQL Server 20082008 R2 Support Expires
How To Cluster MaxDB On Windows In The Cloud

Join Our Mailing List

Copyright © 2025 · Enterprise Pro Theme on Genesis Framework · WordPress · Log in